Apptivo’s July 21, 2018 release delivers a significant list of new features and improvements to the existing ones. This blog summarizes briefly the various features which were worked upon in the July 21, 2018 deployment.
- Data Set in Shipping App
- Warehouse in Orders App
- Triggers in the Suppliers App
- Triggers in the Work Orders App
- Sorting in Customers 360° View
- Triggers in the Projects App
- Bulk Update in Properties App
- Sorting in Employees App
- News Feed into Emails
- Task Update Notification
- Default Value for Country – Advanced Search
CRM
Triggers in the Work Orders App
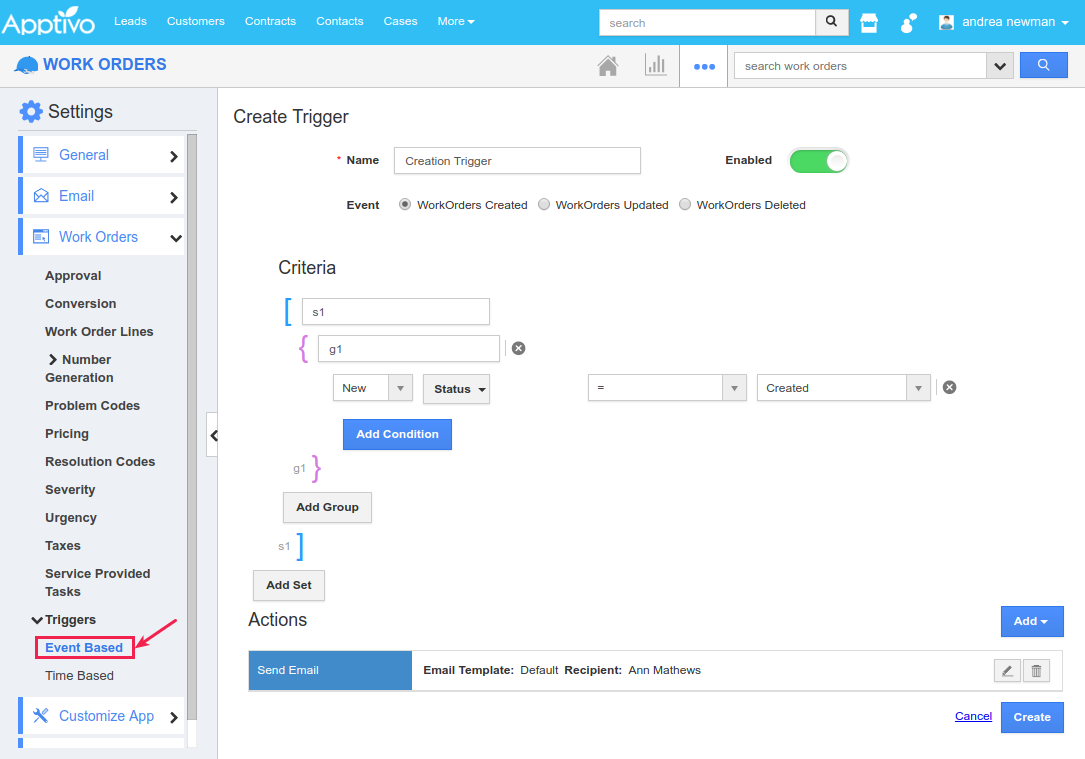
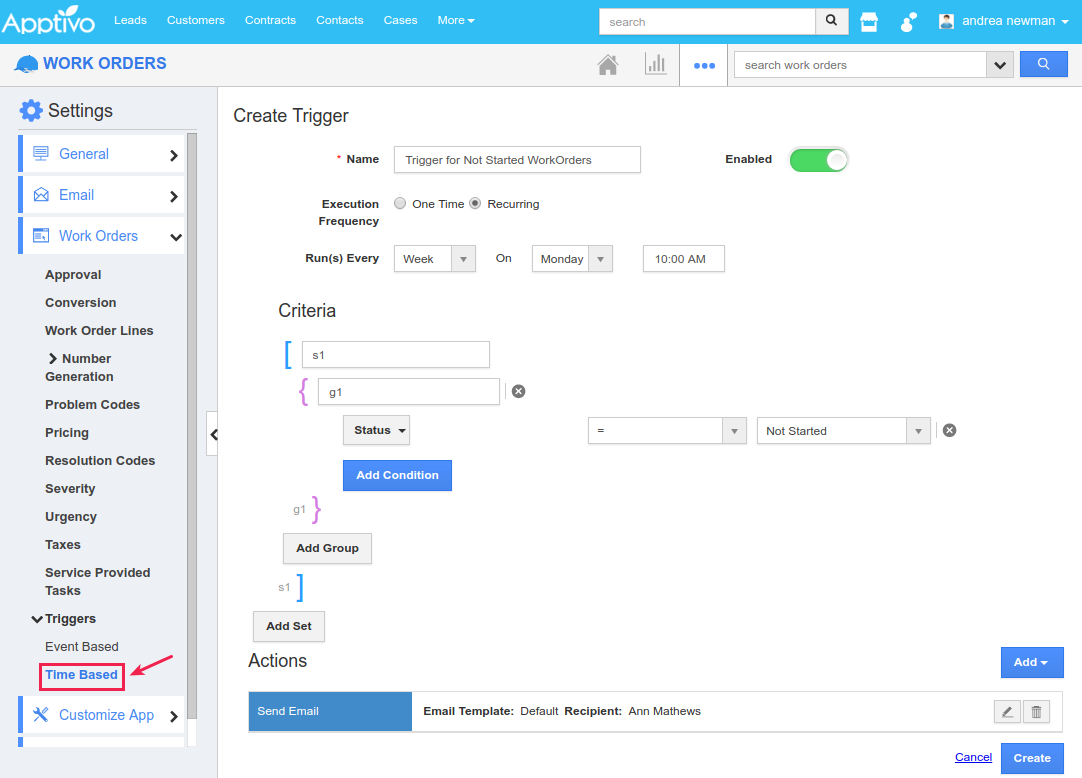
As like in the CRM Apps, you can now create and define triggers in the Work Orders App. You can configure triggers under Settings -> Work Orders -> Triggers. Like in other apps, there are two types of triggers available:
- Event Based – This trigger can be used to perform an automated action, whenever an event occurs. Here, the trigger can be set for the events like Work Orders Creation, Work Orders Updation and Work Orders Deletion.
- Time Based – This trigger lets you perform an action either once (One Time) or for a repeated number of times (Recurring), whenever the trigger criteria is met.
Sorting in Customers 360° View
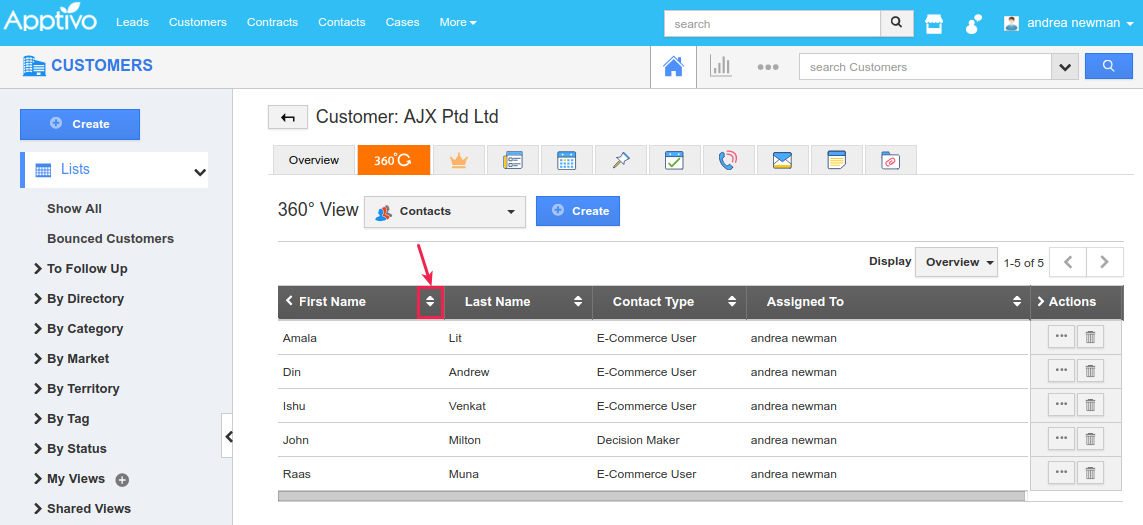
We have implemented the Sorting functionality in the Customers App 360° view. This enables you to sort the customer records in the list layout of the customers 360 degree view.
|
Supply Chain
Data Set in Shipping App
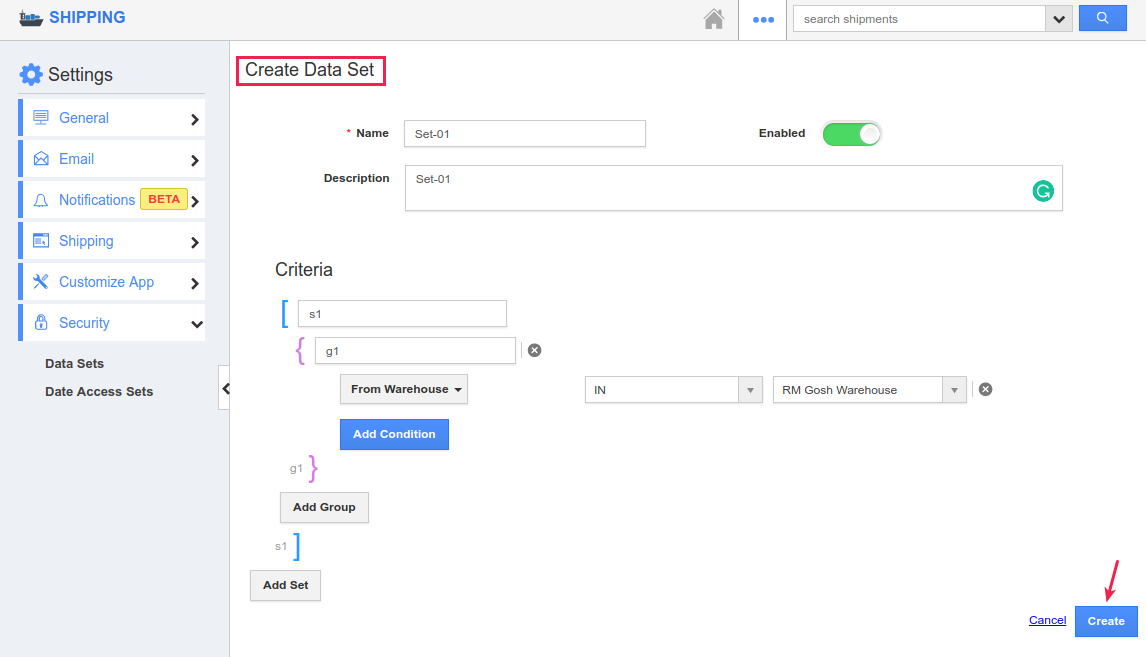
In this release, we have enhanced the Apptivo Shipping App to support giving security access to Warehouses. For this, we have implemented two sections newly in the Shipping App – Data Sets and Data Access Sets. Let us know see how this works.
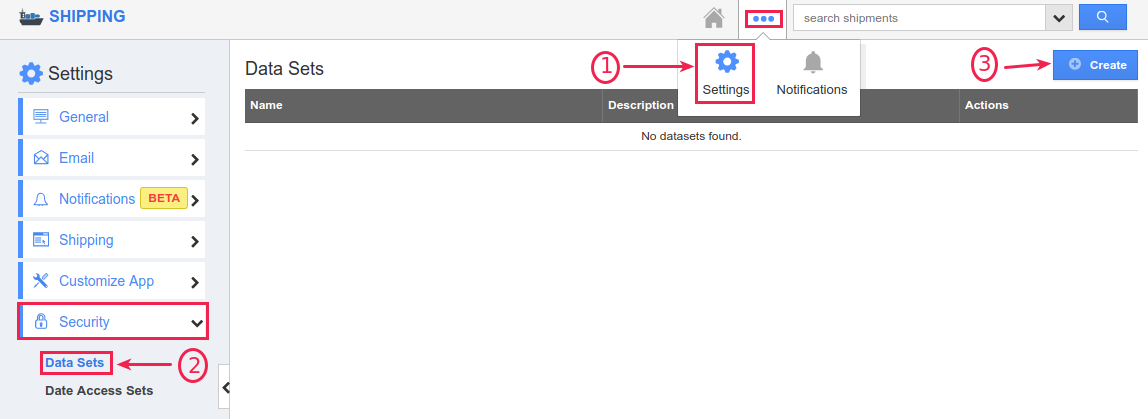
Initially you need to create a Data Set and then give this data set access to the respective employees. As a result, those employees with the particular data set access alone can have access to the respective warehouses in the list page view of the Shipping App in their accounts.
To do so, click on the Shipping App Settings -> Security -> Data Sets. And click Create.
|
In the Create Data Set page, enter the required details corresponding to the data set and click on the Create button.
|
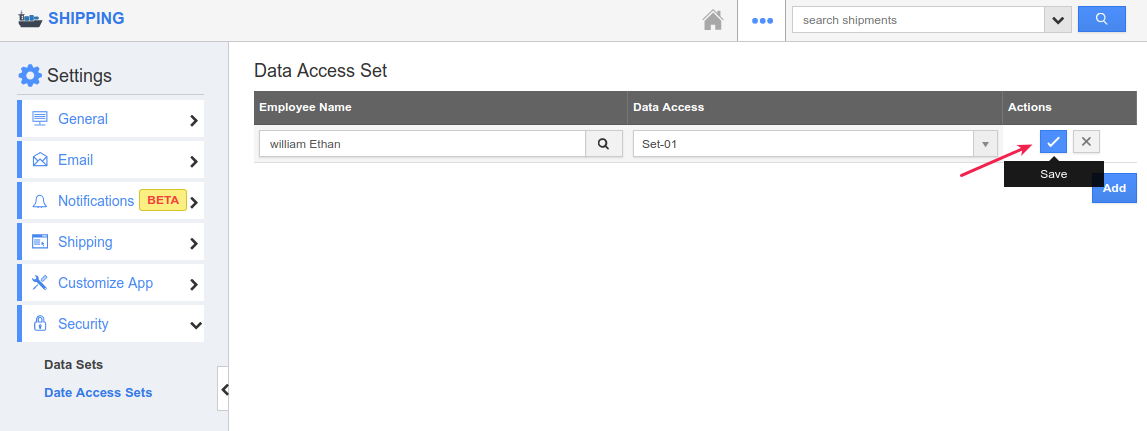
The data set will be successfully created. Now, this data set access should be given to an appropriate employee. For that, click on the Data Access Sets under “Security” and click on “Add”. Now, in the Data Access Set page, search and select the required employee name in the Employee Name field and select the data access from the Data Access dropdown and click on Save.
|
Warehouse in Orders App
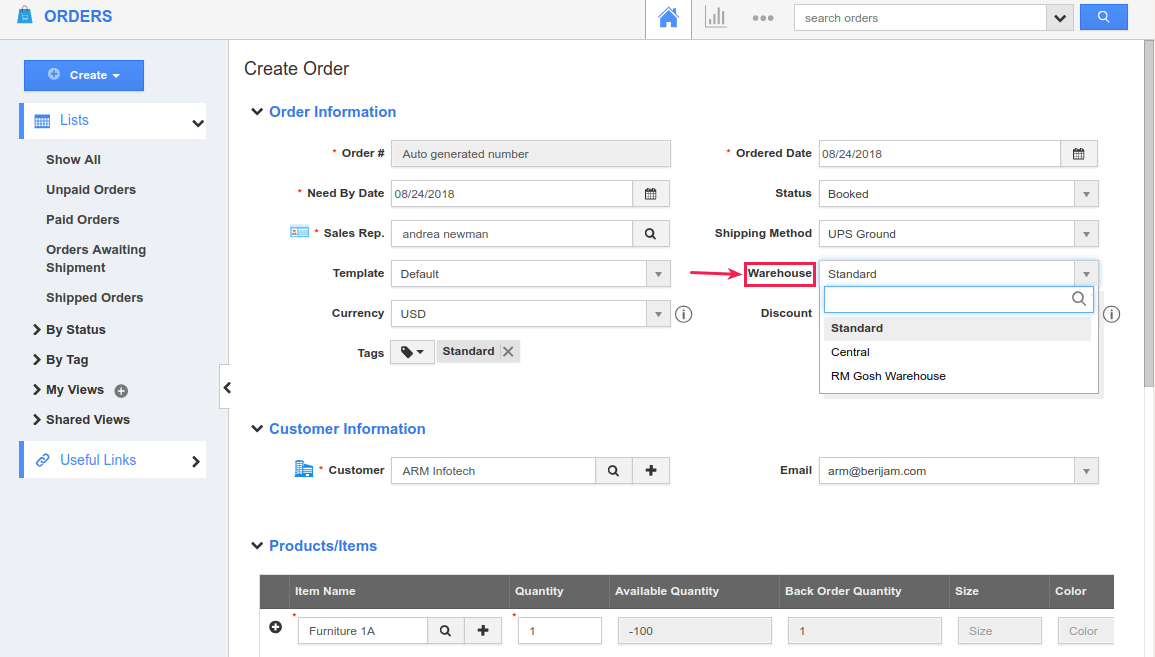
To make the process of creating orders more simpler, we have implemented the Warehouse field in the Orders Header Level. That is while creating orders you can now select the warehouse from which the items are to be fetched, as shown in the below image:
|
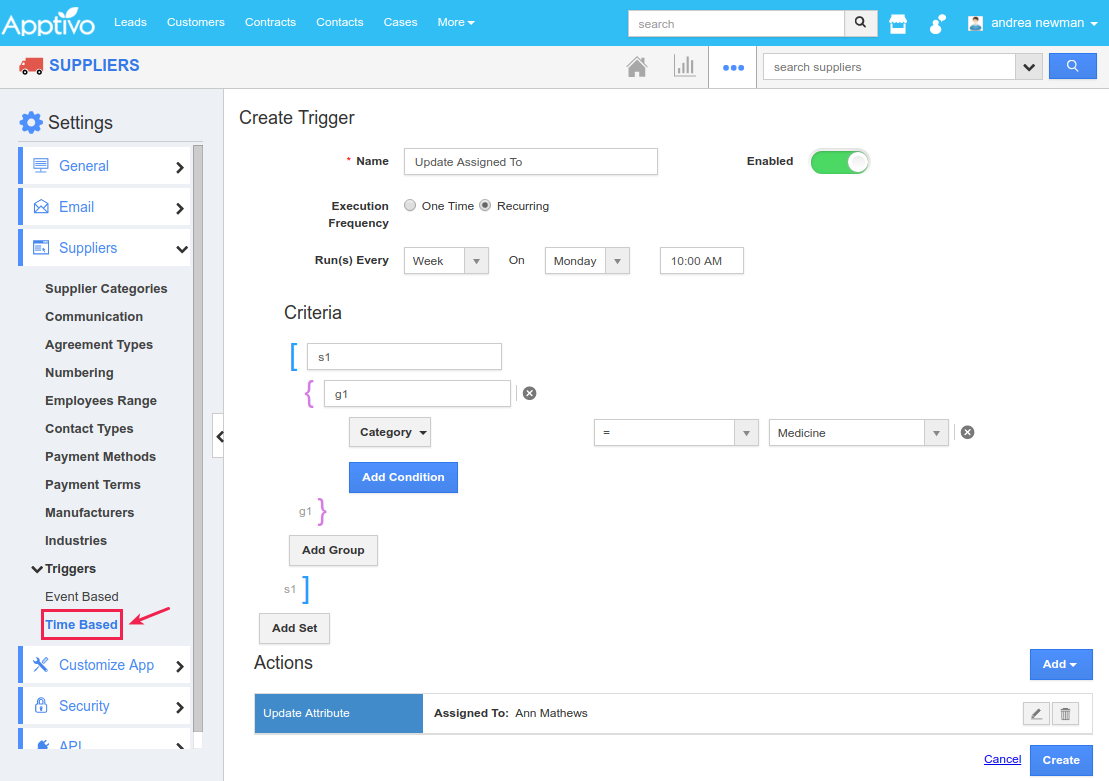
Triggers in the Suppliers App
Triggers isn’t a new feature in Apptivo. Similar to other apps, you can now create and define triggers in the Suppliers App. You can configure triggers under Settings -> Suppliers -> Triggers. Like in other apps, there are two types of triggers available:
- Event Based – This trigger can be used to perform an automated action, whenever an event occurs. Here, the trigger can be set for the events like Suppliers Creation, Suppliers Updation and Suppliers Deletion.
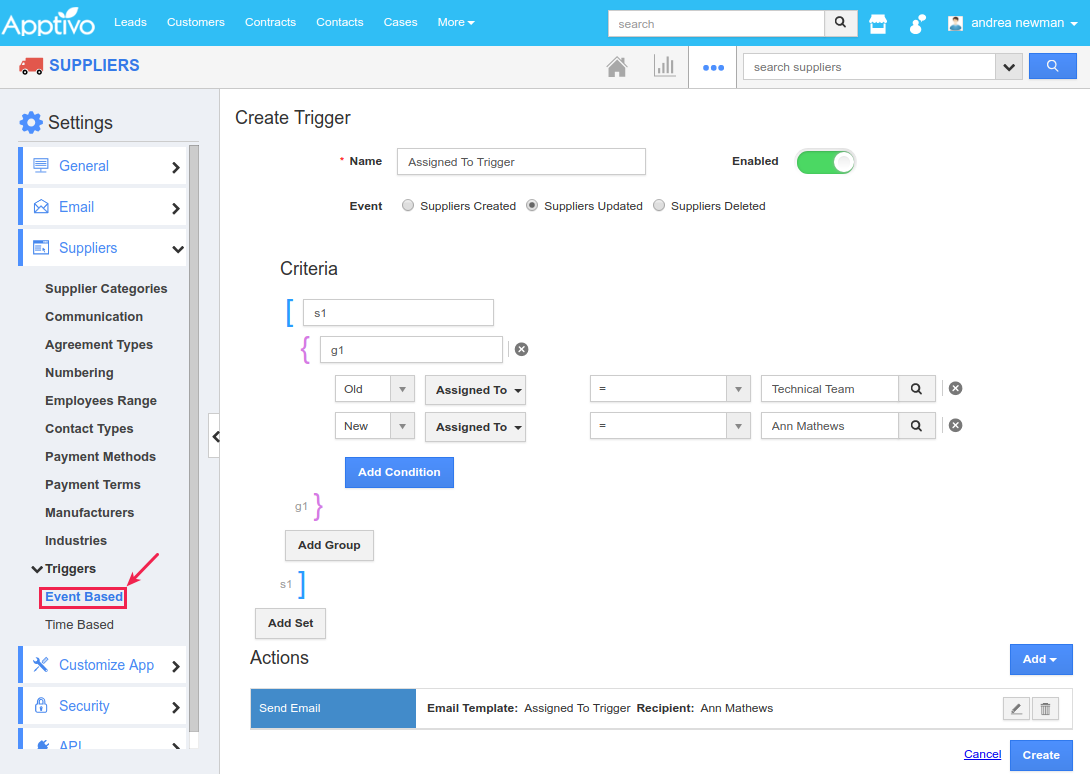
- Time Based – This trigger lets you perform an action either once (One Time) or for a repeated number of times (Recurring), whenever the trigger criteria are met.
Financials
Triggers in the Projects App
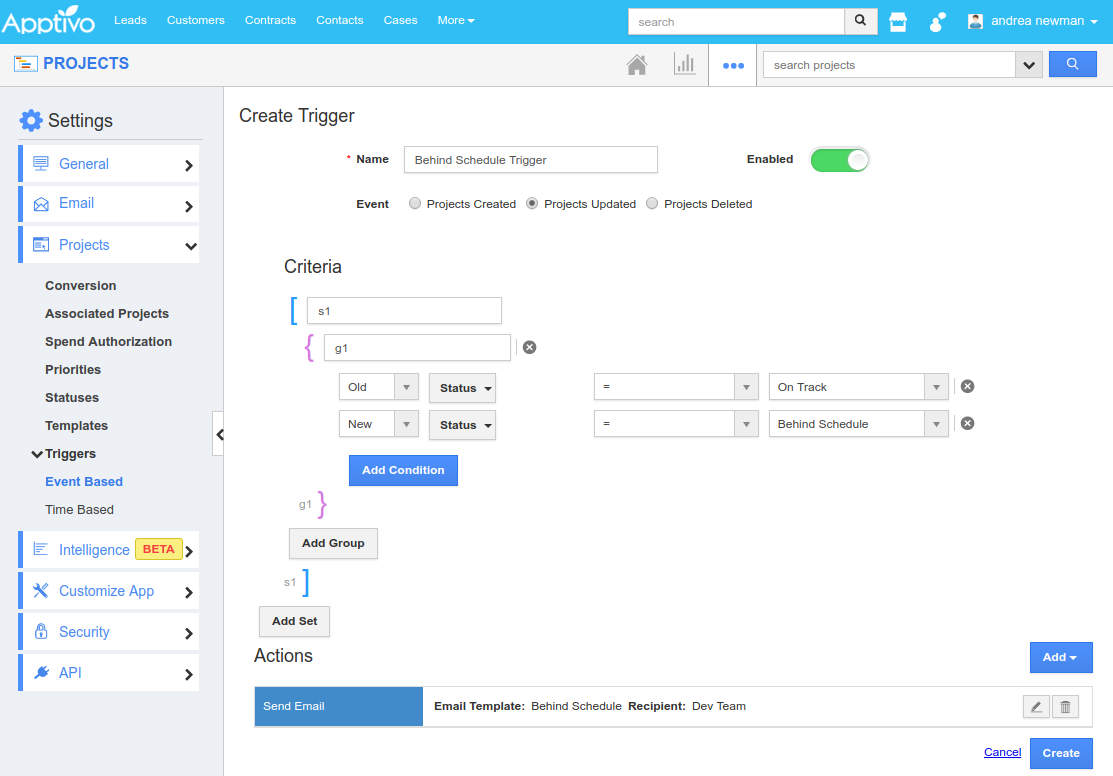
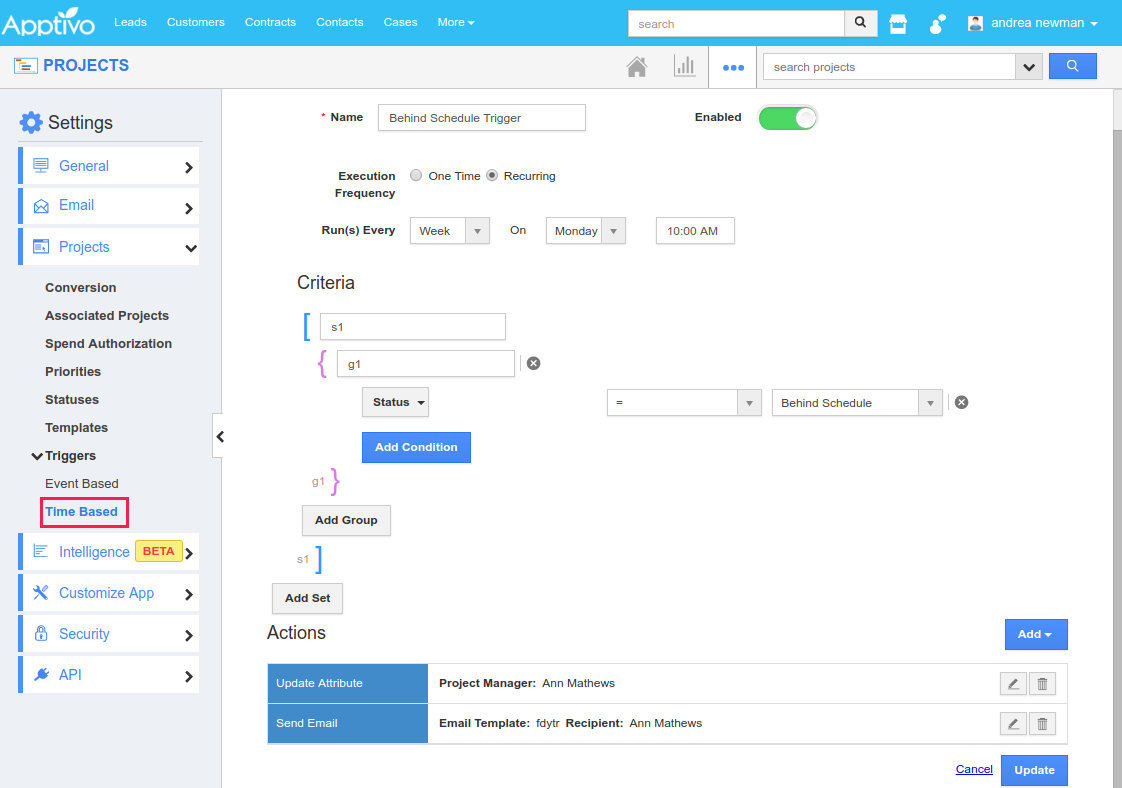
In this update, we have enabled the support of Triggers in the Projects App. You can now configure triggers under Settings -> Projects -> Triggers. Like in other apps, there are two types of triggers available:
- Event Based – This trigger can be used to perform an automated action, whenever an event occurs. Here, the trigger can be set for the events like Projects Creation, Projects Updation and Projects Deletion.
- Time Based – This trigger lets you perform an action either once (One Time) or for a repeated number of times (Recurring), whenever the trigger criteria are met.
Bulk Update in Properties App
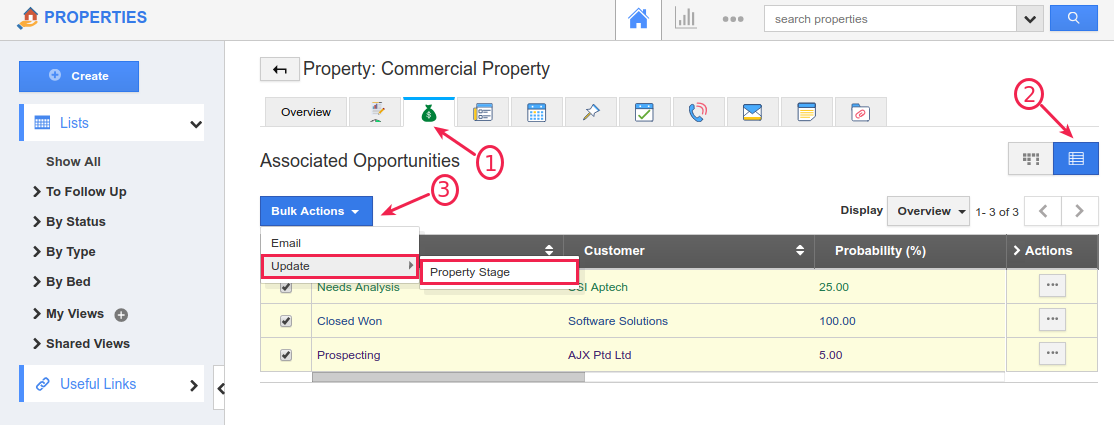
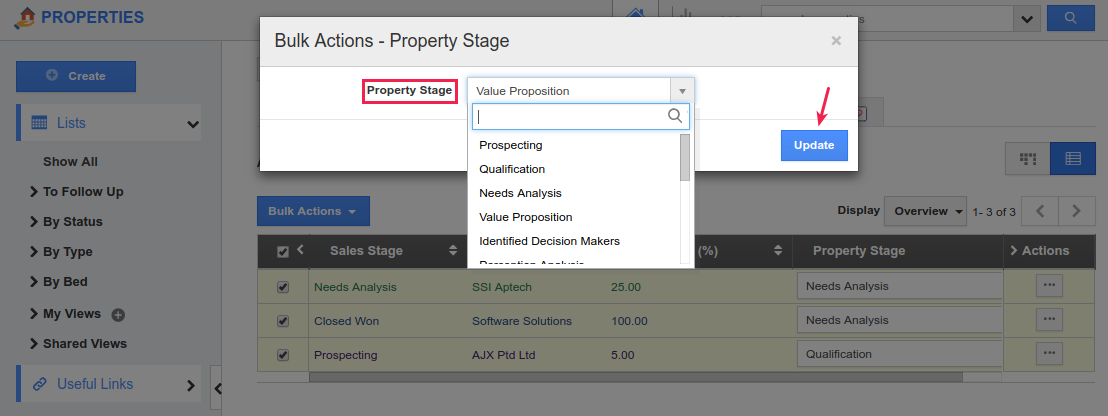
In this release, we have enhanced the Opportunities Tab found in the Properties App. This enhancement enables you to bulk update the Property Stage of all the opportunities found in the opportunities tab of the property record.
To bulk update the Property Stage, click on the Opportunity tab found in the Property Overview page -> select the required opportunities and click on “Bulk Actions” -> “Update” -> “Property Stage”.
|
In the resulting Bulk Actions – Property Stage popup, select the required stage from the Property Stage dropdown and click on Update.
|
Sorting in Employees App
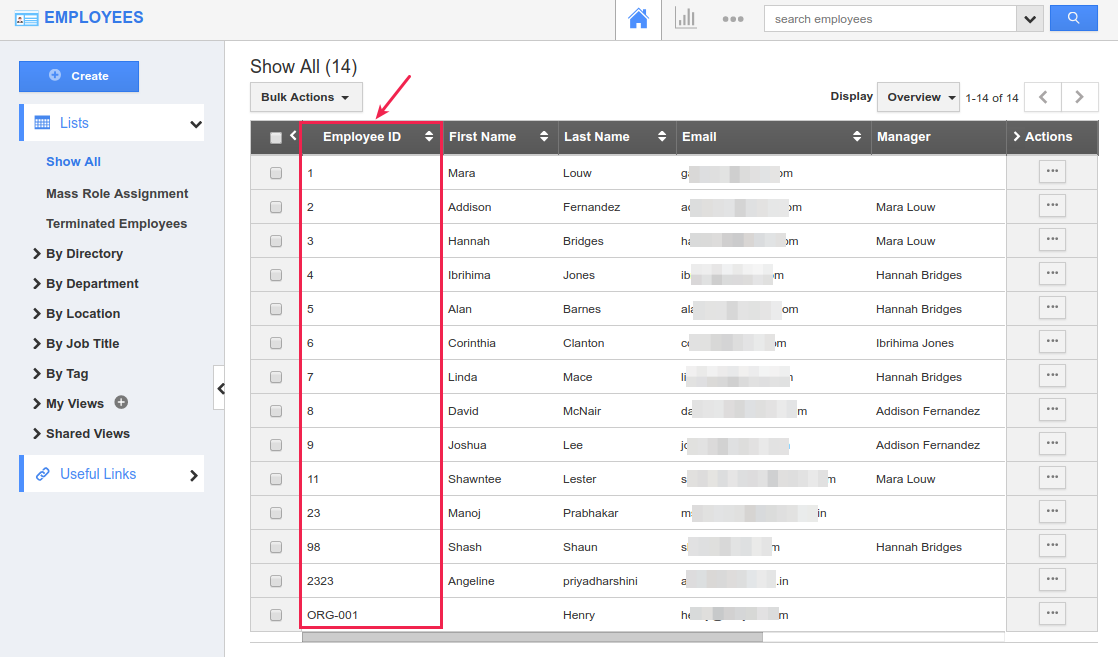
We have updated the feature of Sorting in Employees#. When you sort employees using Employee#, the type of sorting will be in the order of Numbers (0,1,2,11,..etc.), followed by Strings.
|
Collaboration
News Feed into Emails
In general, Newsfeeds in Apptivo constantly displays all the current activities happened. So far, newsfeeds will be generated for all sorts of activities like adding notes, creating new object records, or for updating objects, downloading of documents and so on. In this release, we have now enabled the Newsfeed generation for Emails too.
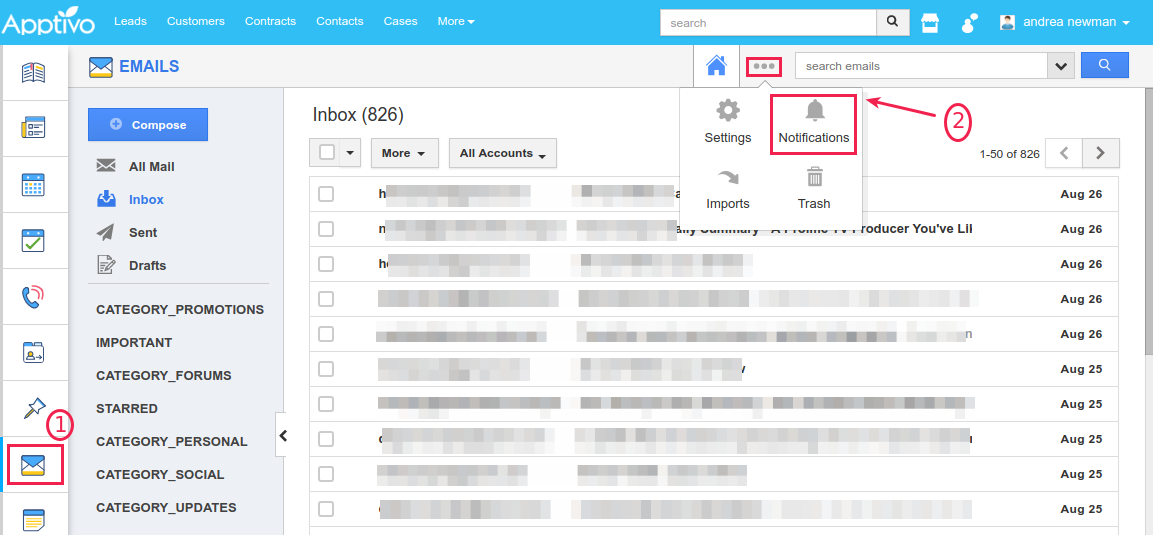
That is, when you send out emails to people in your contacts/customers, that will also get captured and put into the newsfeed. To do so, go to Emails tab in your Apptivo Homepage and click on “Notifications” as shown in the below image:
|
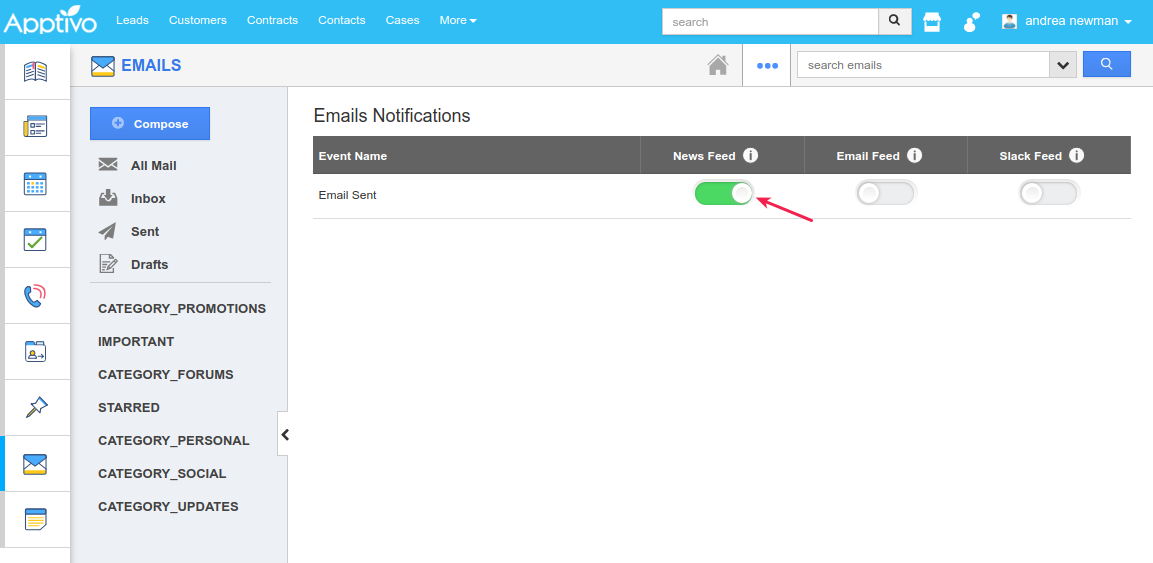
Enable the News Feed toggle for the Email Sent option. This will now auto-generate the newsfeed for every outgoing email.
|
Task Update Notification
One significant release in this deployment is the Task Update Notification in the Homepage Tasks tab. With this feature, you can customize the Email Feed Notification Template contents according to your business requirements. (Note: As an initial stage, we have implemented this to get reflected in the Contacts App)
Go to Tasks Settings > Notifications > Update Notifications and click Create. You can now create a new template by defining the following:
- Criteria – Define the criteria for which the notification is to be generated.
- Message – Enter the message (the content of the notification). You can customize it using various task attributes and widgets provided.
- Recipients – Specify the recipient to whom this notification is to be sent.
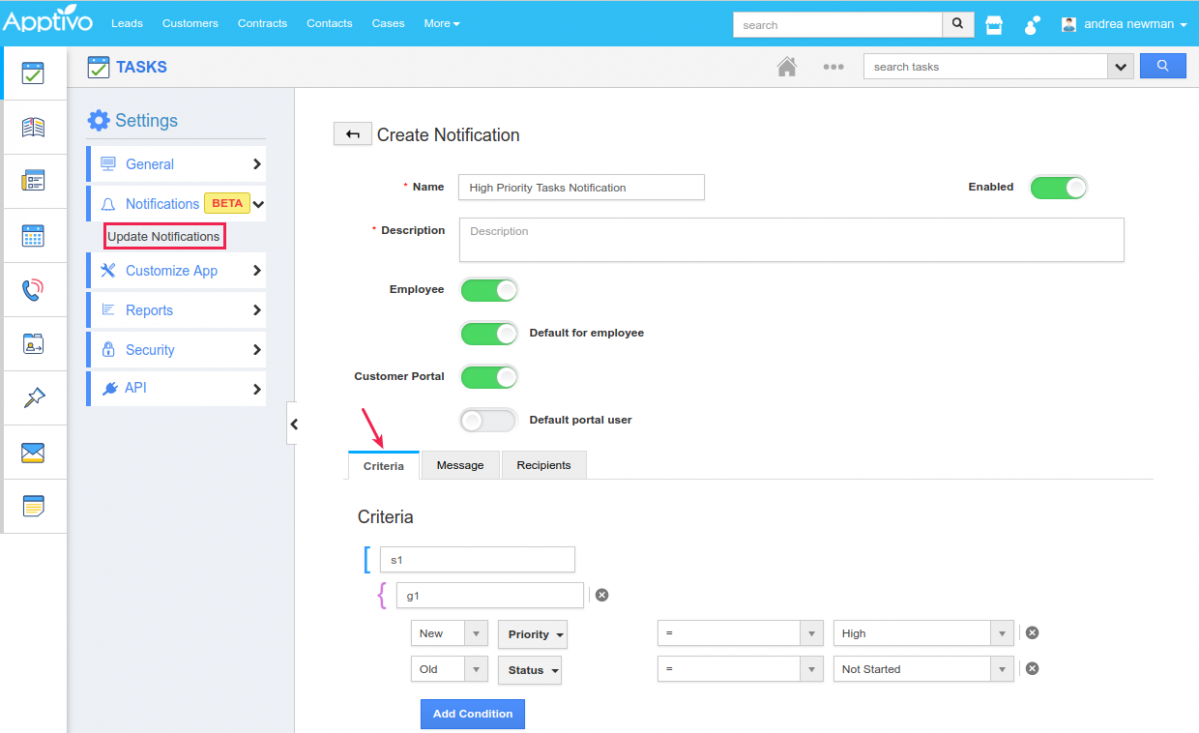
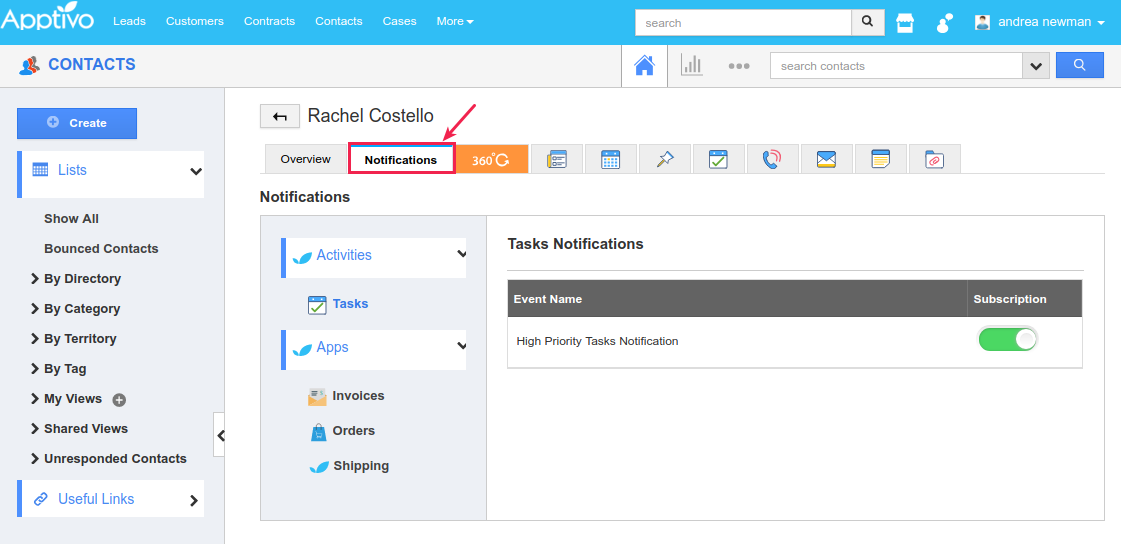
This created notification will now get reflected in the Contacts App. Click on a contact record. You can find the Notifications tab next to the Overview. Clicking on it you can view the task notifications created as shown in the image. Enabling the Subscription toggle, that specific contact will be receiving the configured task update notification.
|
Note: To view the Notifications tab in the Contacts page, go to Contacts App Settings > Security > Actions > scroll down to the last and Enable the Notifications Tab toggle present.
General Updates
Default Value for Country – Advanced Search
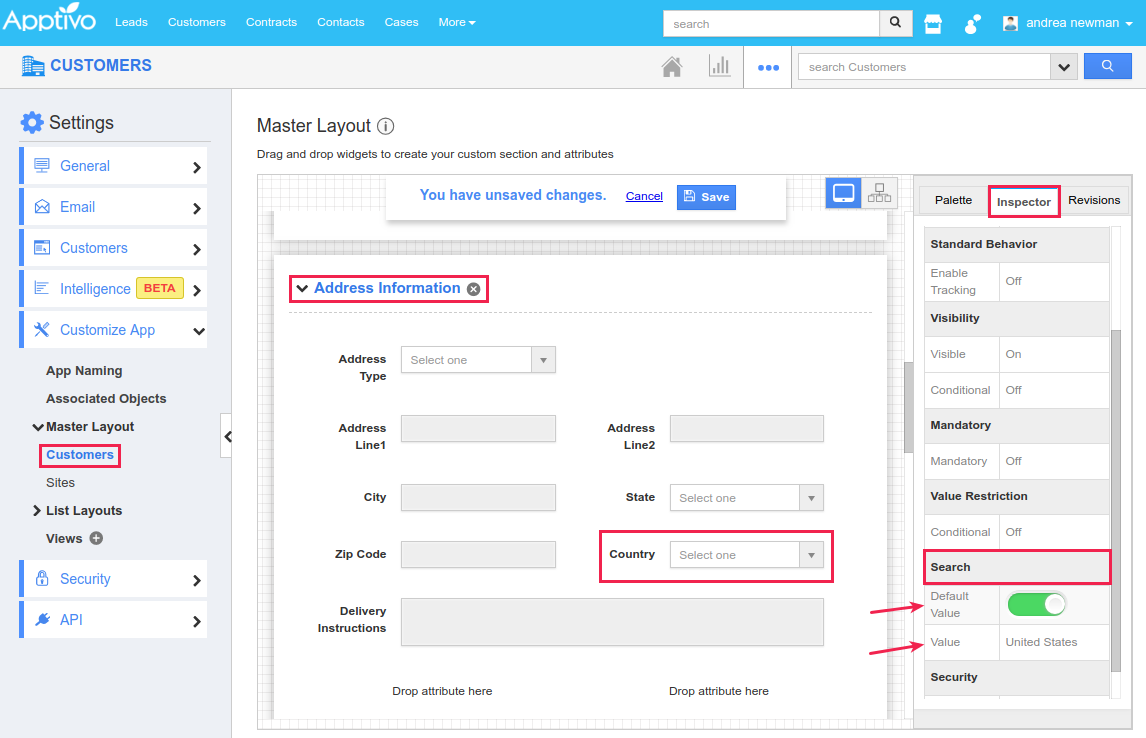
With this feature update, you now have the ability to set a Default Value for the Country field in the Advanced Search of all the apps.
For instance: Consider the Customers App. Go to Settings > Customize App > Master Layout > Customers and click on the Country field found in the Address Information section. And enable the Default Value toggle under Search from the Inspector tab and set the required country to be set as default in the Value drop-down.
|
Latest Blogs
Apptivo's Integration with Amazon SES for Outgoing Email Server
Amazon Simple Email Service (SES) is an email platform that provides an easy, cost-effective way to send and receive email using your email addresses and domains. Apptivo has migrated its email service to Amazon SES (Simple Email Service) to enhance the performance and reliability of our email services
Read more →
EXPLORING MULTI CHANNEL CUSTOMER SUPPORT SOFTWARE
1.What is customer service software? 2
Read more →
Maximize your business performance with seamless CRM Integration
1.What is CRM Integration? 2
Read more →
