We are glad to announce the feature updates and release of new features in Apptivo, which were deployed on February 03, 2018. Get to know the latest features and keep yourself updated on what’s new in Apptivo. The following are the list of features which were worked on, in the last deployment:
- Data level security exceptions – Leads, Contacts & Customers
- Customer association with Customer ID while importing – Contacts App
- Export option in the Campaigns App
- Inner item line in Estimates Print/Web layouts
- Edit feature for the UOM category formula in side panel view – Estimates App
- Auto roll up cost in the Items App
- Child item association in the Items App
- Multi select email attachments
- Disallow past date – Date Attribute
- Ability to enter texts manually in String function – Function Attribute
- Performance Optimization – Contacts, Supplier Payments, Customer Payments, Credit Notes, and License Tracker
CRM
Leads, Contacts & Customers App
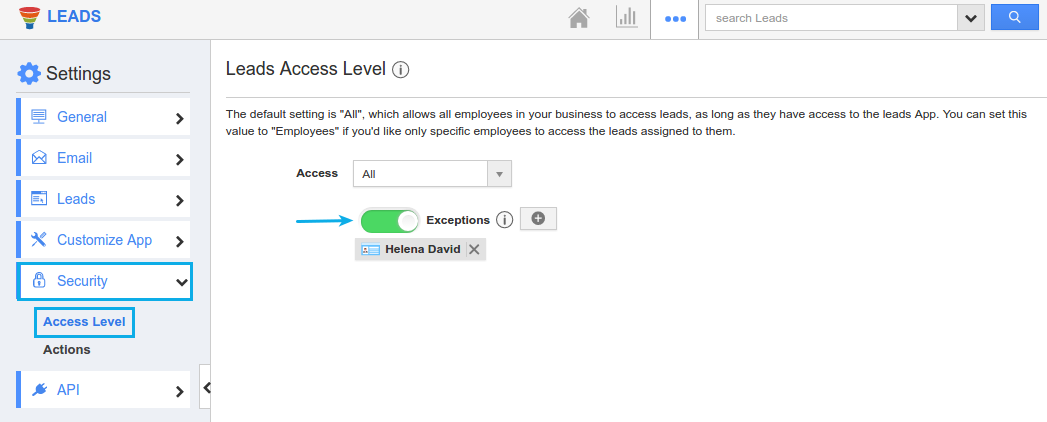
- Data level security exceptions – We have enhanced the Data Level Security feature in the Leads, Contacts and Customers App. Similar to the Opportunities App, we have added the Exceptions toggle in data level security.
Consider the Leads App, where a super user wants his employees to access only the leads assigned to them. Besides that, he also wants his Sales Manager, to access all leads (in spite of being not assigned to him). In that case, the data level access can be set to Employees and Sales Manager can be added to the Exceptions category. (Note: Sales Manager should be given the privilege to access the Leads App. Only then he can get access to all the leads.)
Contacts App
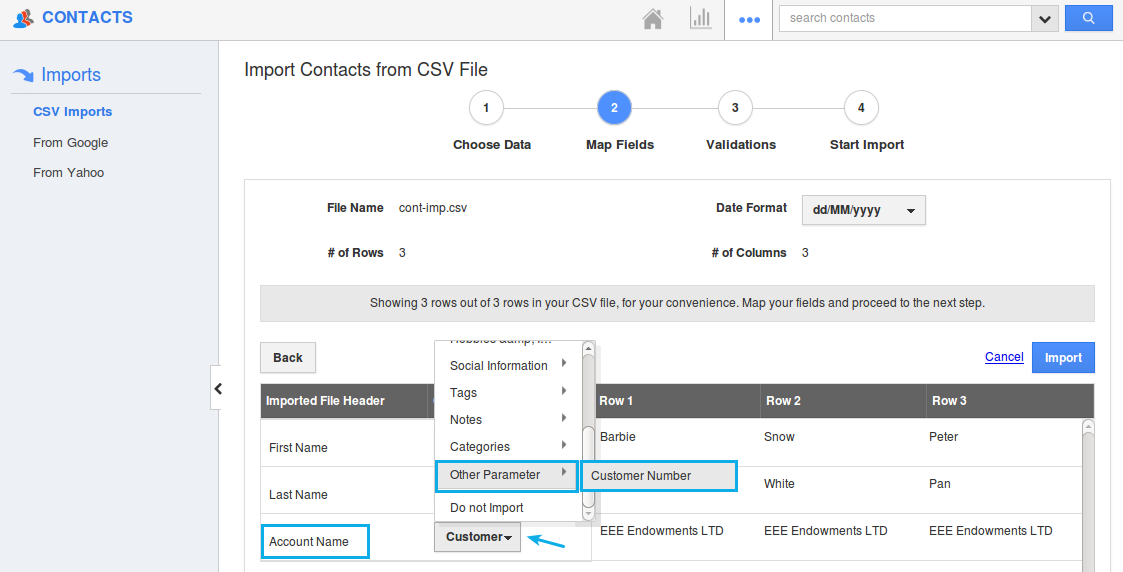
- Customer association with Customer ID while importing – As you all know already, during the Contacts Import, you can associate customers with contacts. In order to associate customers with contacts, the existing method was to map the Customer Name. Now, this updation lets you to associate customers using Customer ID while importing. That is, consider you are having a Contacts CSV file with Customer ID. Now, when importing new contacts, this feature checks for the Customer ID in the Customers App. If it finds a match, then that contact record will get imported into Apptivo Contacts App.
Marketing
Campaigns App
- Export option in the Campaigns App – We have added the “Export” option in the Communication Dashboard of the Campaigns App. Once a campaign is launched, this feature gives you the ability to export your Contacts, Targets, Leads, Customers & Employees in CSV files.
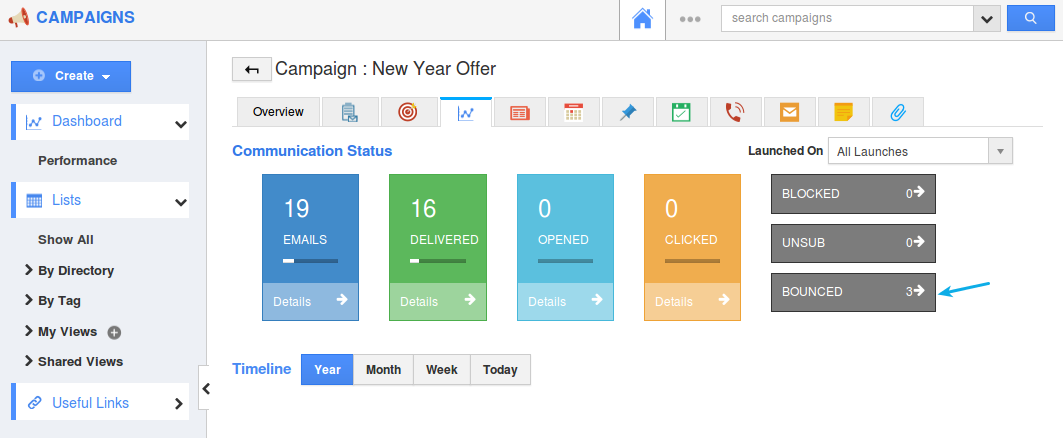
To do so, click on the Dashboard tab from the Campaigns Overview page. You can view the communication status of that launched campaign, where you can view number of emails delivered, opened, clicked, blocked, bounced etc. Now, consider you would like to export the list of bounced object records. Click on Bounced.
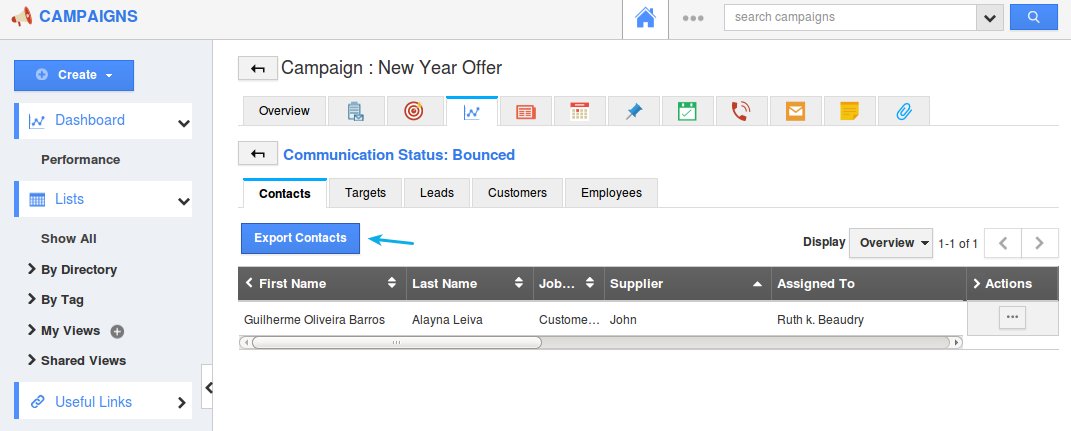
Now, click on Export Contacts found. The list of bounced contacts will be downloaded as a CSV file, which can be used for further reference. Similarly, you can export bounced leads, customers, employees, and targets.
Financial Management
Estimates App
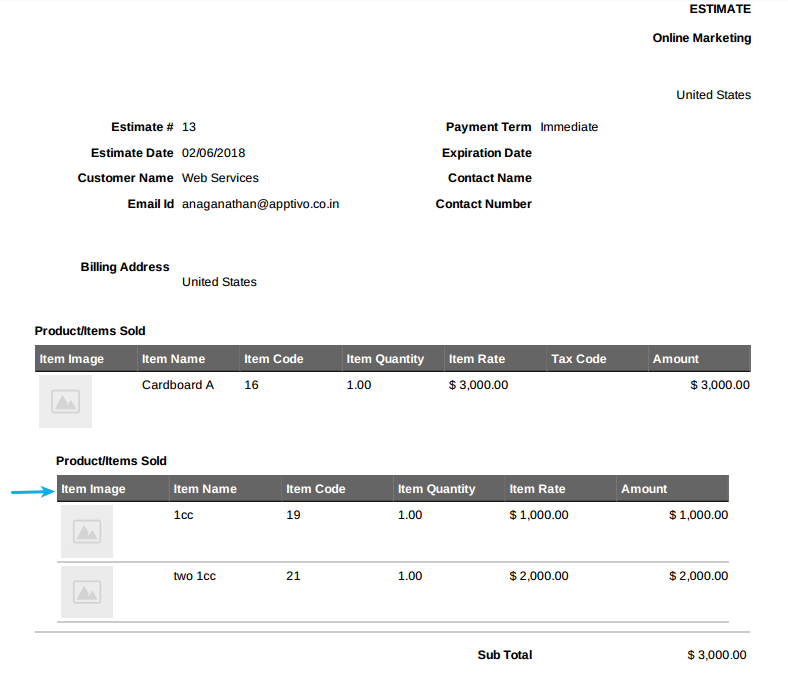
- Inner item line in Estimates Print/Web layouts – We have added an inner item line in the Estimates Print/Web layouts. Apptivo Estimates App gives you the ability to set item value based on uom category. This feature will now enable you to view the choices (selected while creating Estimates) in the Estimates PDF. In order to view the choices selected in the PDF, you are required to enable it first, from the Settings. (Note: This feature can be applied only to the new PDF templates. It is not applicable for the existing templates you have)
Go to Estimates App Settings -> Customize App -> Print/Web Layouts. Select the required PDF template. Click on the Product/Item Sold section.
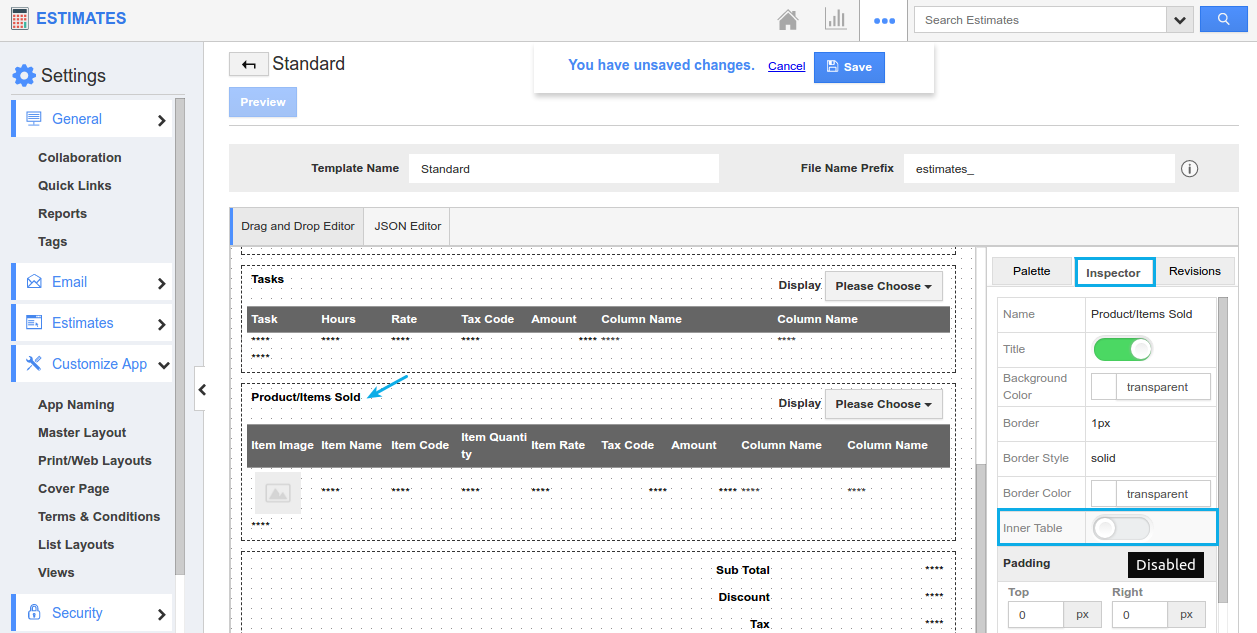
Slide the toggle ON for Inner Table. And click on Save. In the Estimates Overview page, make sure to select the above configured template in the Template dropdown. When sending out Estimates PDF to your customers, you can now view the selected choices as shown in the image below:
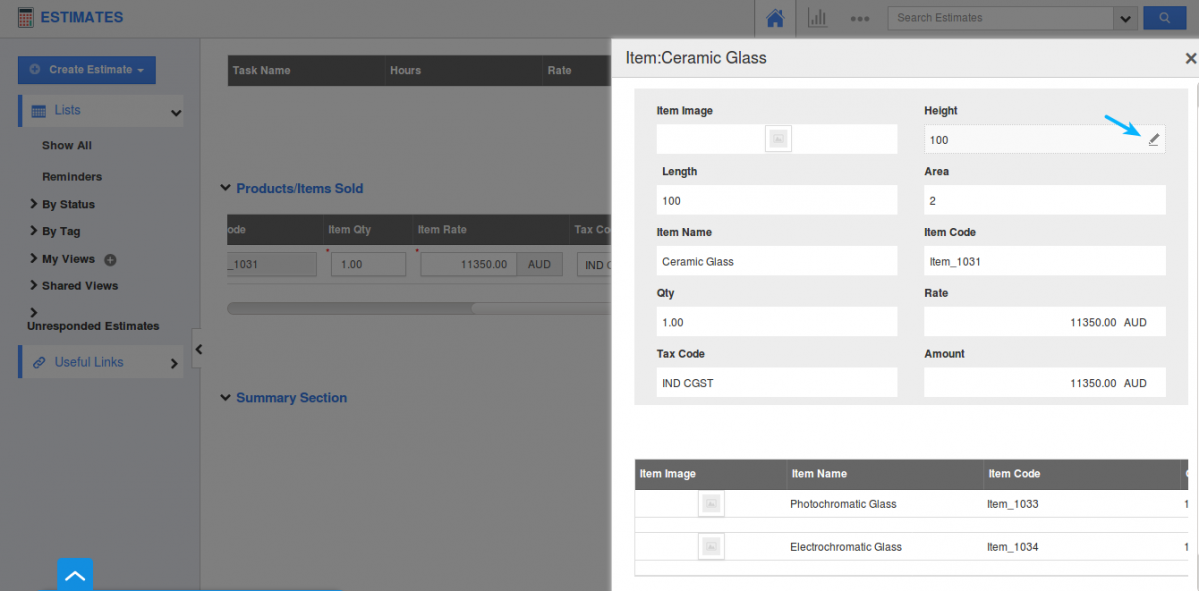
- Edit feature for the UOM category formula in side panel view – We have once again improved the feature of UOM category in the Estimates App. To improve efficiency and enable customers to edit the dimensions from the side panel itself, we have provided the Edit feature for the UOM (Units of Measurement) category formula. Now, by clicking the Side panel icon (At the end of Products/Items sold line level), you can view the Item overview. If you want to change the dimensions of the items, you can do it by moving the cursor to view the “Edit” icon near the dimension (height or width or both). Edit the values according to your requirements and click on “Save” button.
Supply Chain
Items App
- Auto roll up cost – We have newly added the feature of Auto Roll Up Cost in the Items App. This feature can be used only when the Bill of Materials (BOM) Type is Standard. Now, it provides you with the added cost of all the components in the BOM. This added cost will get displayed in the “Standard Cost” field in the Items Overview page.
Consider an item, where the following components are added in the BOM.
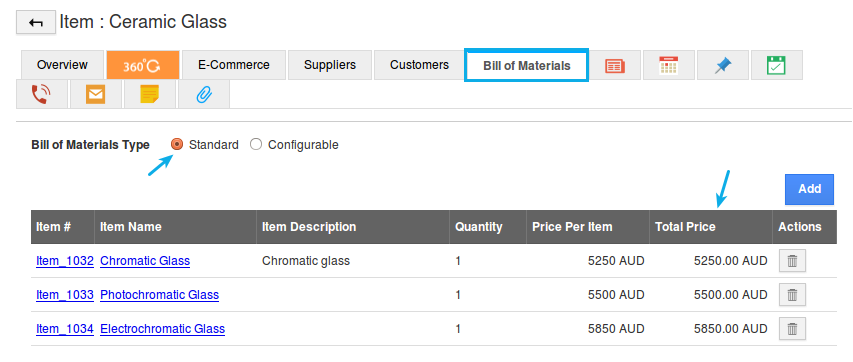
Go back to the Overview page and enable the “Auto Roll Up Cost” toggle under the “Item Information” section. On enabling, a new standard cost will be displayed, which is the sum of Total Price of all the components added in the BOM.
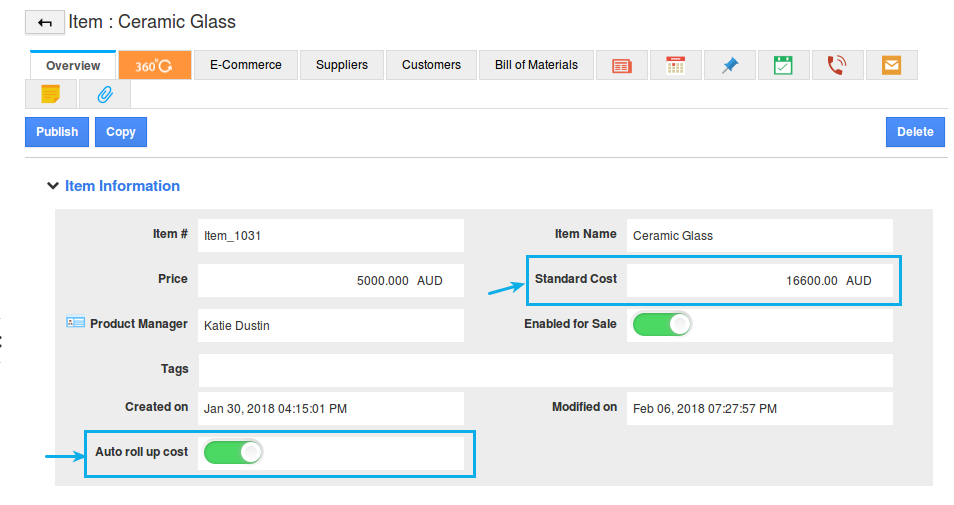
Now, the Standard Cost becomes a non-editable one. In case, if you do not want the components price to get summed up, you can anytime disable the Auto roll up toggle. And you can edit the standard cost, as desired.
Note: Existing users need to enable the Auto roll up toggle, from the Items App Settings -> Customize App -> Master Layout -> Customize App -> slide the toggle ON for the Auto roll up cost from the Hierarchical view.

- Child item association – We have enhanced the parent-child association of items in the Items App. Consider you have a parent item (Desktop Computers), and have created the following child items (keyboard# and mouse#).
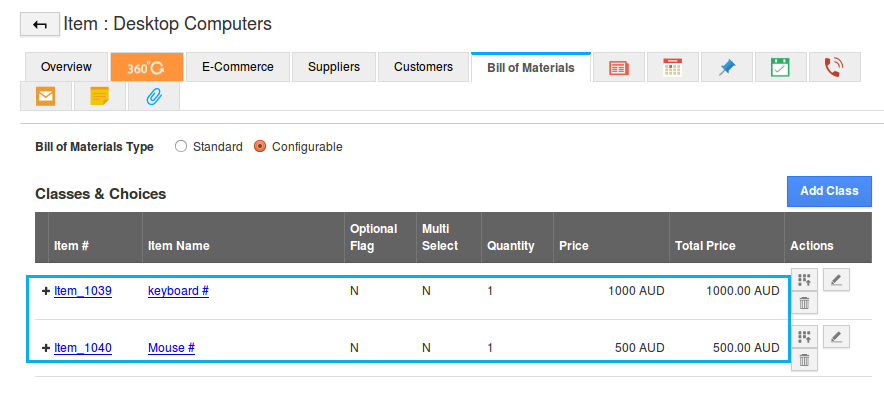
Now, this feature update does not allow you to add the parent item (Desktop Computers) as an association for the child items (keyboard# and mouse#).
General Updates
- Multi select email attachments – We have improved the feature of attachments of documents to enable attaching multiple files at a time. Consider you are required to attach an “n” number of documents for a customer, when sending emails to him. You can now attach more than one file at a time from your computer (From Computer).
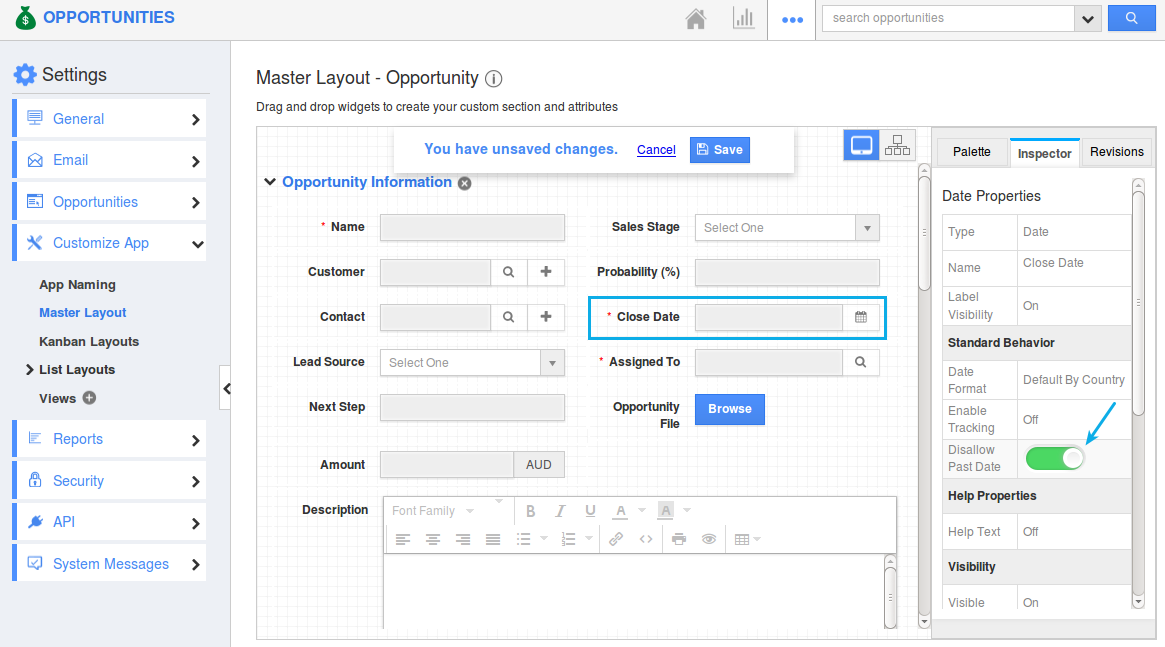
- Disallow past date in Date Attributes – This feature gives you the ability to restrict the past dates in the Date Attribute in all apps. Consider the Close Date in the Opportunities App. In general, when creating Opportunities, the Close Date will be in present or in the near future. In that case, you can disallow the past dates from the Close Date attribute. To do so, go to the Opportunities App Settings -> Customize App -> Master Layout -> click on the Close Date -> slide the toggle ON for Disallow Past Date from the Inspector tab.
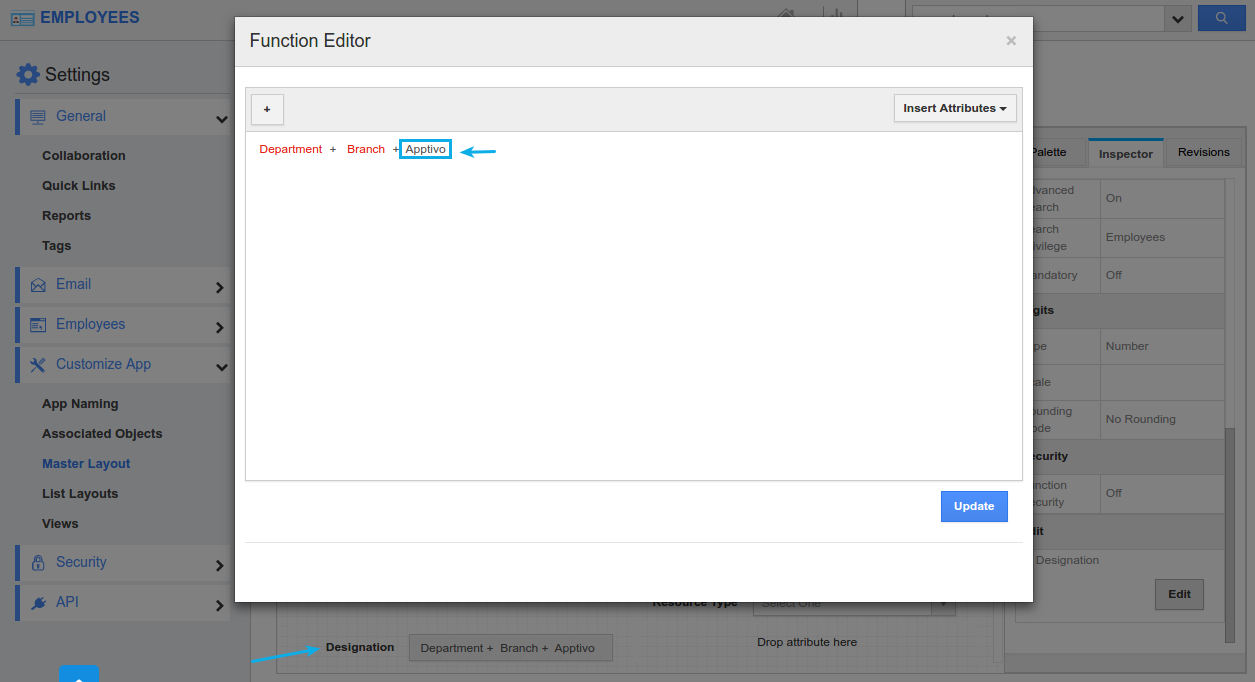
- Ability to enter texts manually in String function attributes – We have enhanced the String Formula Attribute. This will now enable you to enter text manually in the function editor. Consider you would like to view the Designation of your Employees in a single field as shown in the image below:
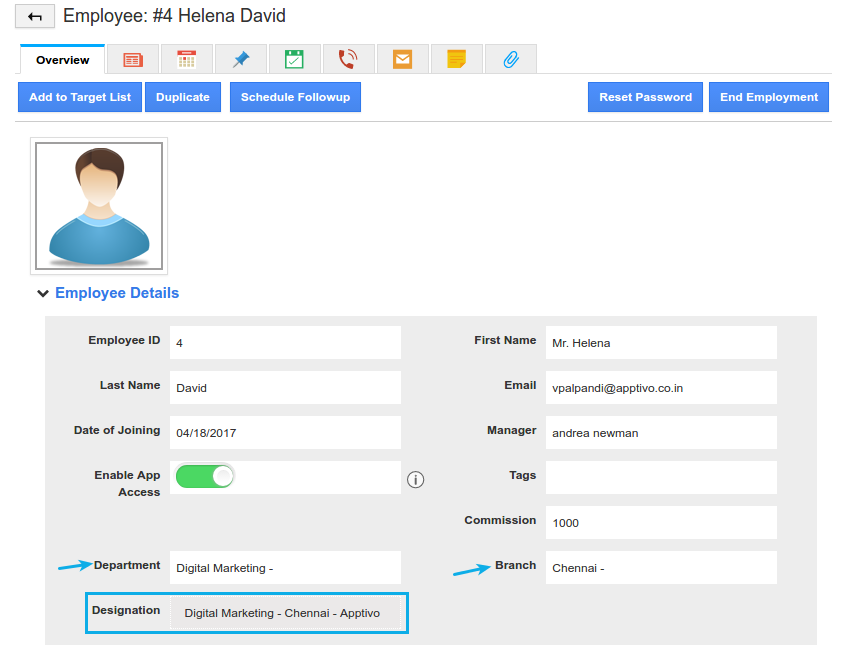
In this above example, the Designation field is string function attribute, where we have concatenated the Department, Branch, and Apptivo (being manually entered).
- Performance Optimization – We have worked on performance related changes which reduces the initial load time for the following apps – Contacts, Supplier Payments, Customer Payments, Credit Notes, and License Tracker.
Release Notes for February 03, 2018: Financials, CRM, Marketing, Supply Chain & Collaboration was last modified: December 14th, 2022 by
Latest Blogs

Apptivo's Integration with Amazon SES for Outgoing Email Server
Amazon Simple Email Service (SES) is an email platform that provides an easy, cost-effective way to send and receive email using your email addresses and domains.
Apptivo has migrated its email service to Amazon SES (Simple Email Service) to enhance the performance and reliability of our email services
Read more →
EXPLORING MULTI CHANNEL CUSTOMER SUPPORT SOFTWARE
1.What is customer service software?
2
Read more →
Maximize your business performance with seamless CRM Integration
1.What is CRM Integration?
2
Read more →
Consider the Leads App, where a super user wants his employees to access only the leads assigned to them. Besides that, he also wants his Sales Manager, to access all leads (in spite of being not assigned to him). In that case, the data level access can be set to Employees and Sales Manager can be added to the Exceptions category. (Note: Sales Manager should be given the privilege to access the Leads App. Only then he can get access to all the leads.)

|

|
To do so, click on the Dashboard tab from the Campaigns Overview page. You can view the communication status of that launched campaign, where you can view number of emails delivered, opened, clicked, blocked, bounced etc. Now, consider you would like to export the list of bounced object records. Click on Bounced.

|
Now, click on Export Contacts found. The list of bounced contacts will be downloaded as a CSV file, which can be used for further reference. Similarly, you can export bounced leads, customers, employees, and targets.

|
Go to Estimates App Settings -> Customize App -> Print/Web Layouts. Select the required PDF template. Click on the Product/Item Sold section.

|
Slide the toggle ON for Inner Table. And click on Save. In the Estimates Overview page, make sure to select the above configured template in the Template dropdown. When sending out Estimates PDF to your customers, you can now view the selected choices as shown in the image below:

|

|
Consider an item, where the following components are added in the BOM.

|
Go back to the Overview page and enable the “Auto Roll Up Cost” toggle under the “Item Information” section. On enabling, a new standard cost will be displayed, which is the sum of Total Price of all the components added in the BOM.

|
Now, the Standard Cost becomes a non-editable one. In case, if you do not want the components price to get summed up, you can anytime disable the Auto roll up toggle. And you can edit the standard cost, as desired.
Note: Existing users need to enable the Auto roll up toggle, from the Items App Settings -> Customize App -> Master Layout -> Customize App -> slide the toggle ON for the Auto roll up cost from the Hierarchical view.

|

|
Now, this feature update does not allow you to add the parent item (Desktop Computers) as an association for the child items (keyboard# and mouse#).

|

|
In this above example, the Designation field is string function attribute, where we have concatenated the Department, Branch, and Apptivo (being manually entered).

|
Latest Blogs

Apptivo's Integration with Amazon SES for Outgoing Email Server
Amazon Simple Email Service (SES) is an email platform that provides an easy, cost-effective way to send and receive email using your email addresses and domains. Apptivo has migrated its email service to Amazon SES (Simple Email Service) to enhance the performance and reliability of our email services
Read more →
EXPLORING MULTI CHANNEL CUSTOMER SUPPORT SOFTWARE
1.What is customer service software? 2
Read more →
Maximize your business performance with seamless CRM Integration
1.What is CRM Integration? 2
Read more →
