We are happy to give away the new Windows Apptivo All-in-One App build V 6.3.2.0. To enhance your business we have done a couple of implementations in this release. Take a glance at the software by streaming your eyes through this report.
Download the latest version of the Apptivo Windows App
- Supported Custom and Cases Extended App
- Auto Association of Collaboration Activities
- Create and set privileges for tags
- Supported Numbers to words conversion
Supported Custom and Cases Extended App
We have added in a couple more apps to the All-In-One bundle – Custom App and Cases Extended App. This will help you to develop your business in an effective manner. The Custom and Cases Extended App created can now be accessed in your Windows devices. Let’s see a brief description of each of the apps included in this bundle:
- Custom App – A custom app of your preference
- Cases Extended App – A custom app with the functionalities extended from the Cases App
Note: Both the Custom and Cases Extended App should be created from the web version using the App Builder. Kindly check our online documentation on How to Create a new Custom App in Apptivo.
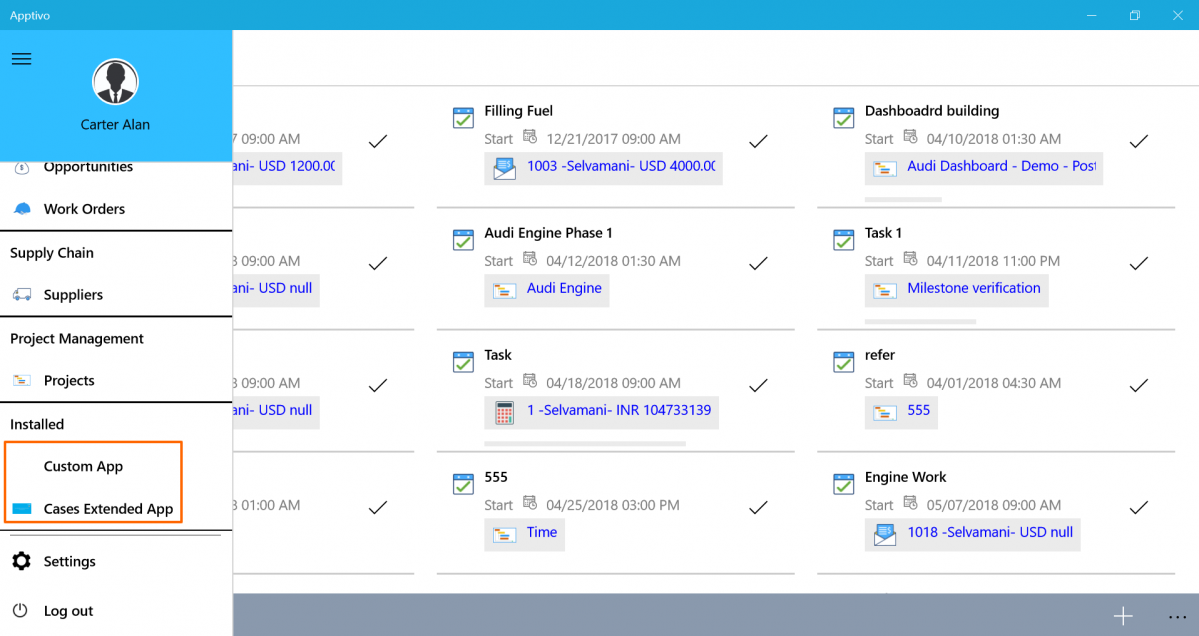
|
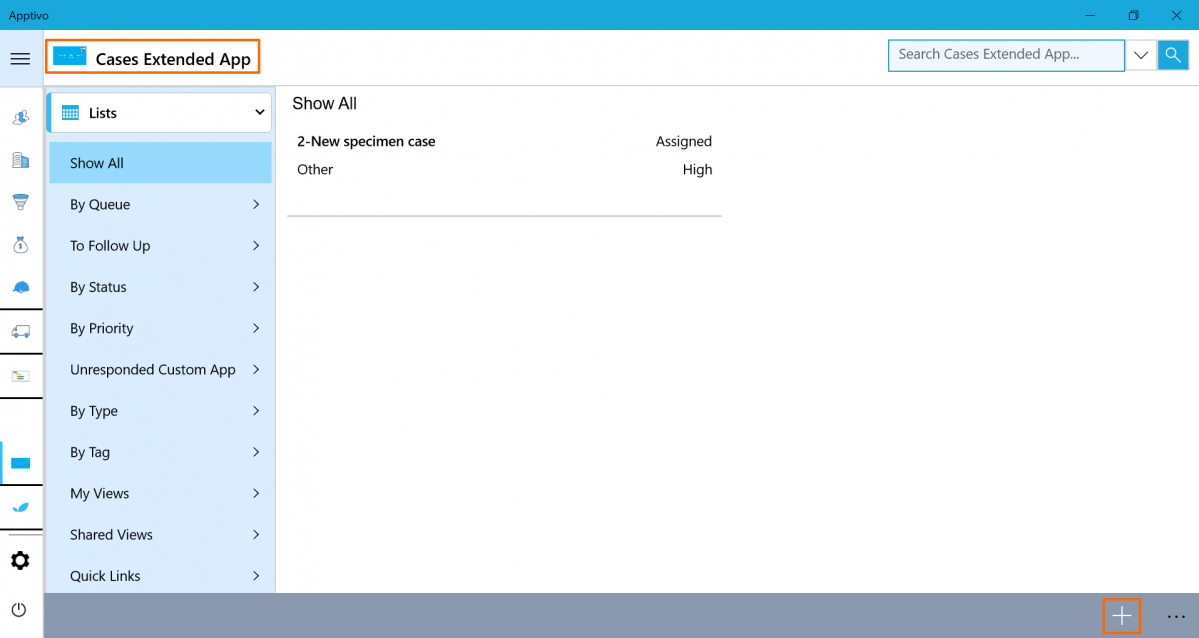
Clicking on the app, you can view the object records of the custom app, edit, and search for the object records. And you can also create new object records by clicking on the “+” icon, which will also get reflected in the web.
|
Auto Association of Collaboration Activities
A notable feature in this release is we have provided an option to associate the attributes of all the apps in the Apptivo with the Collaboration Activities. This feature of Collaboration Auto-Association is an enhancement to all the Apptivo Apps that allows you to auto-associate the activities not only to the customer but also to the parent customer associated with the respective customer. This will enable you to assign the activities at a single stretch to the concerned customers and the Parent Customer. The Collaboration Auto-Association feature can be used for activities like Events, Call Logs, Notes, Tasks, and Emails.
Note: The feature goes in only for the Premium and the Ultimate plans.
Here is the sequence of steps to Auto-Associate the Parent Customer with Activities.
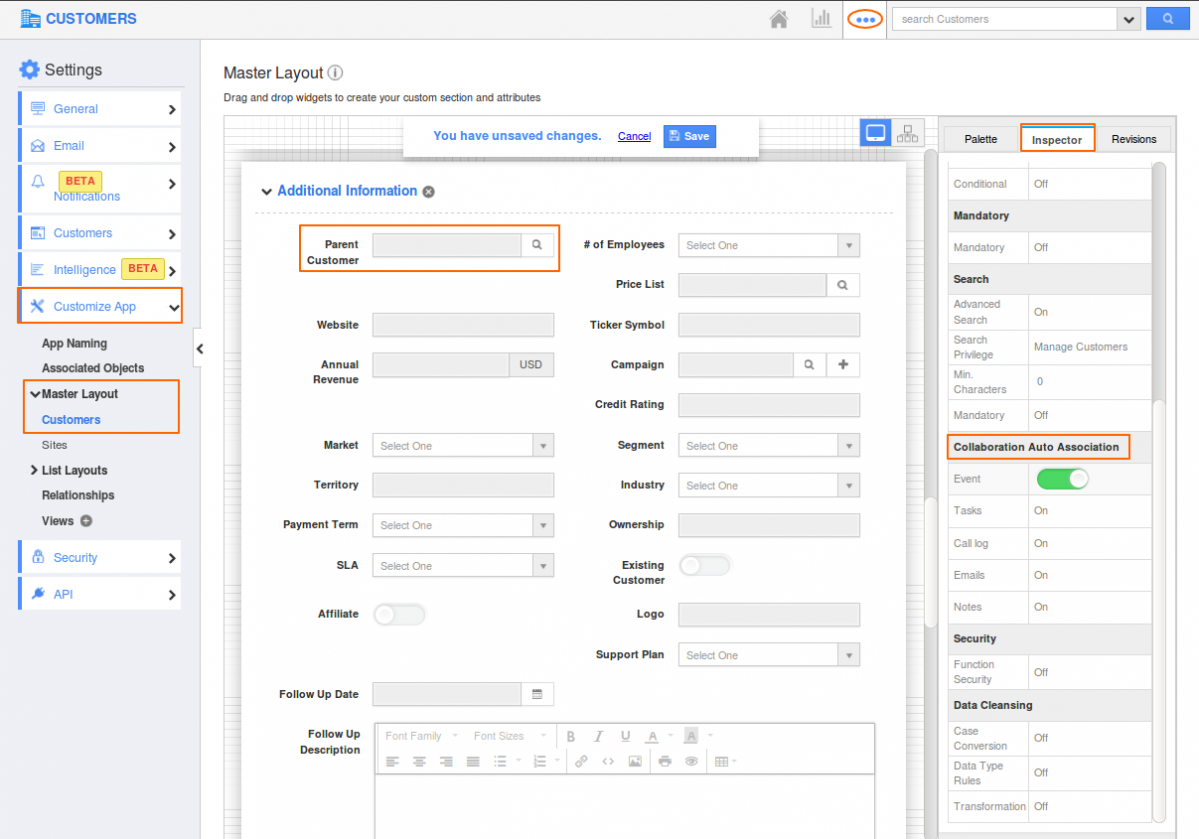
Log in and access Customers App from your universal navigation menu bar. Click on the More(…) icon -> Settings -> Customize App -> Master Layout -> Customers. Select the Parent Customer to enable the toggle under Collaboration Auto Association for Tasks in the Inspector tab. Then, click Save.
|
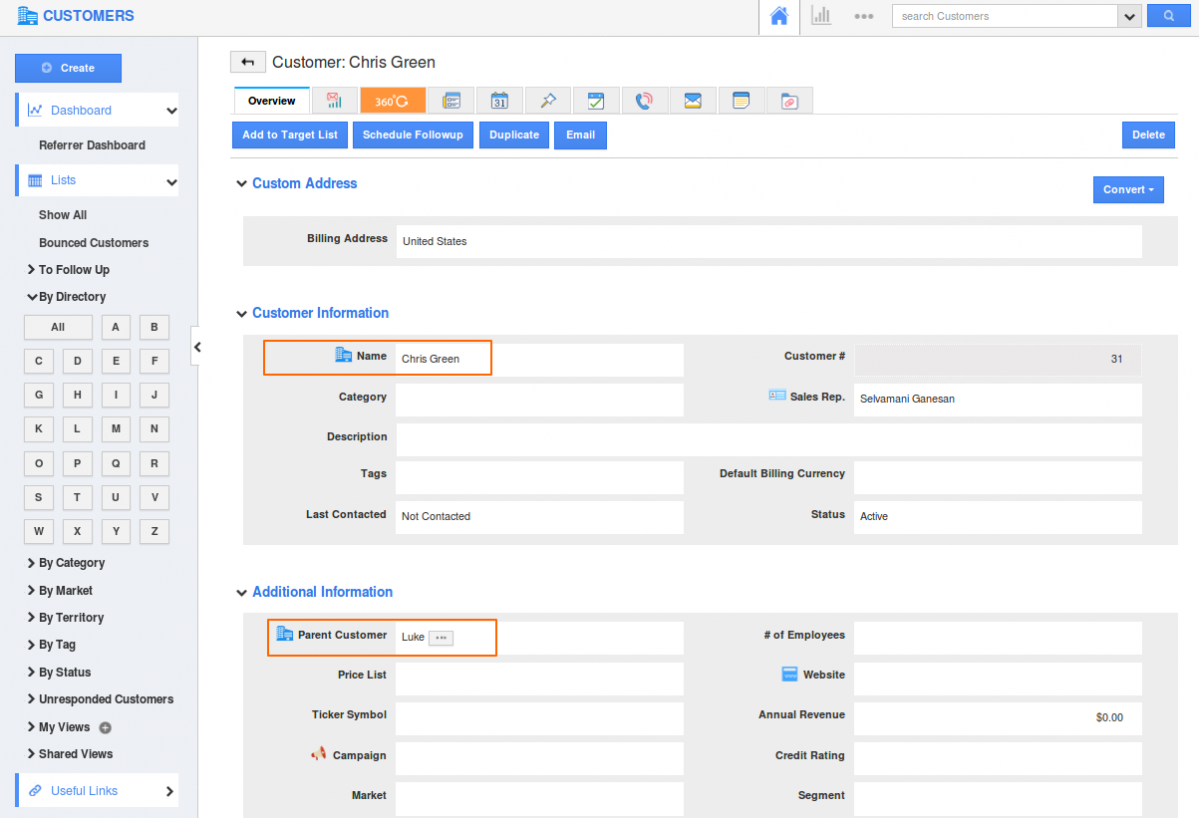
Here the Parent Customer(Luke) is associated with the respective customer.
|
In your windows device, select the same customer(Chris Green)
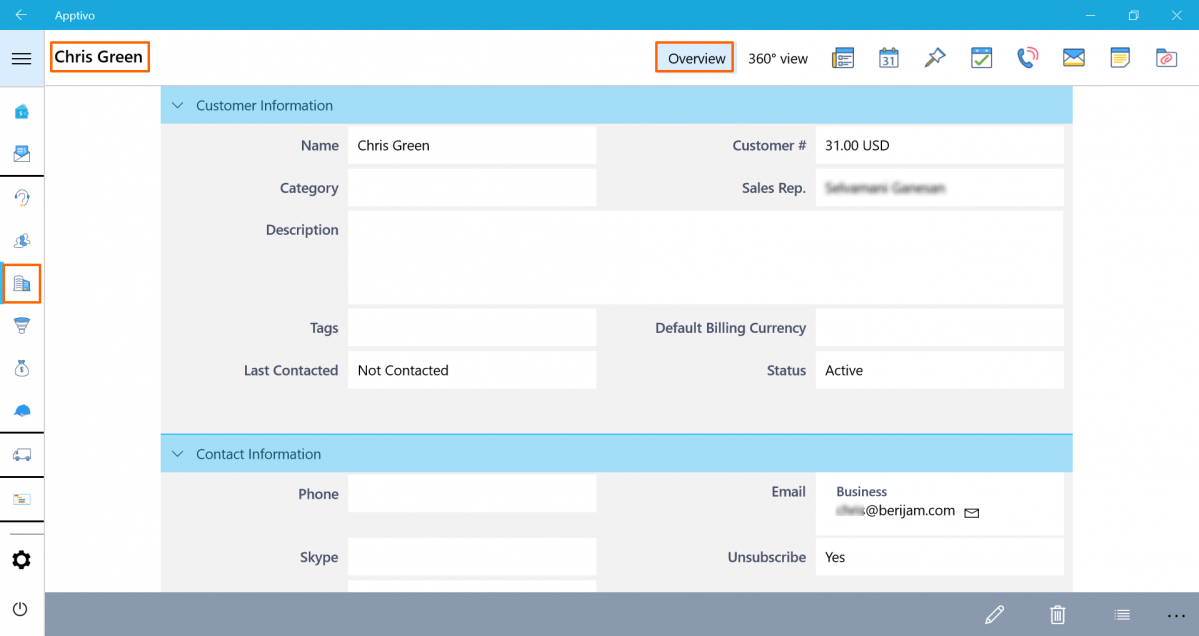
|
Click on the (…)More option and Add Task to create a new task for the customer
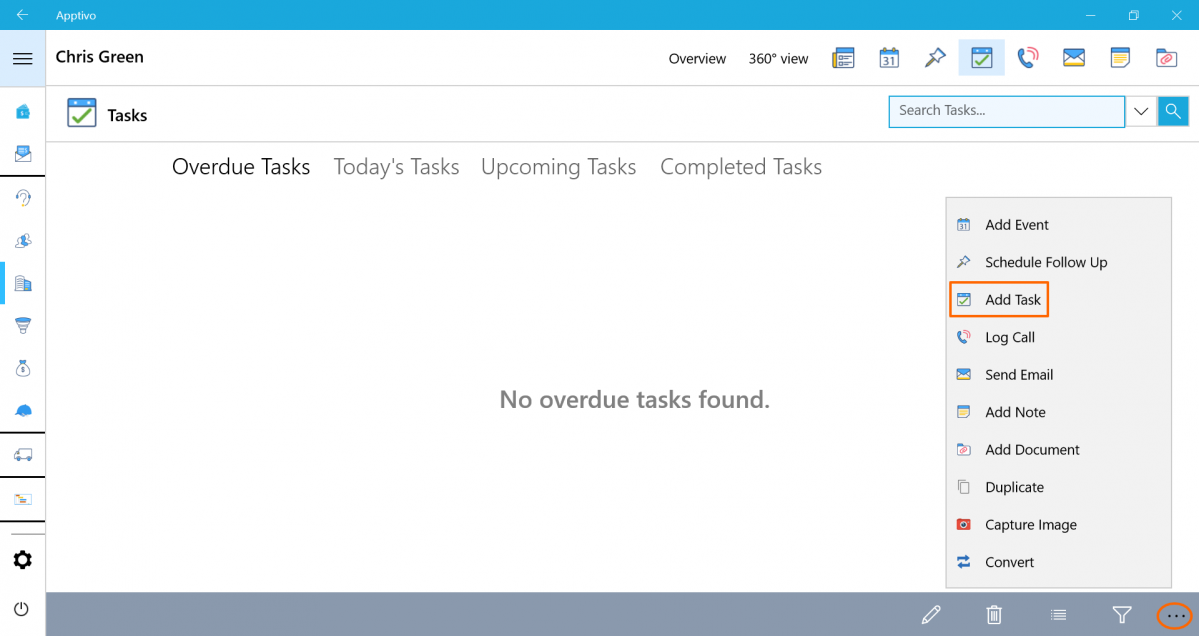
|
Besides being associated with the customer, you can now find the task associated with the Parent Customer(Luke) in the “Associated With” fields. Fill in the Task details and Click on Create.
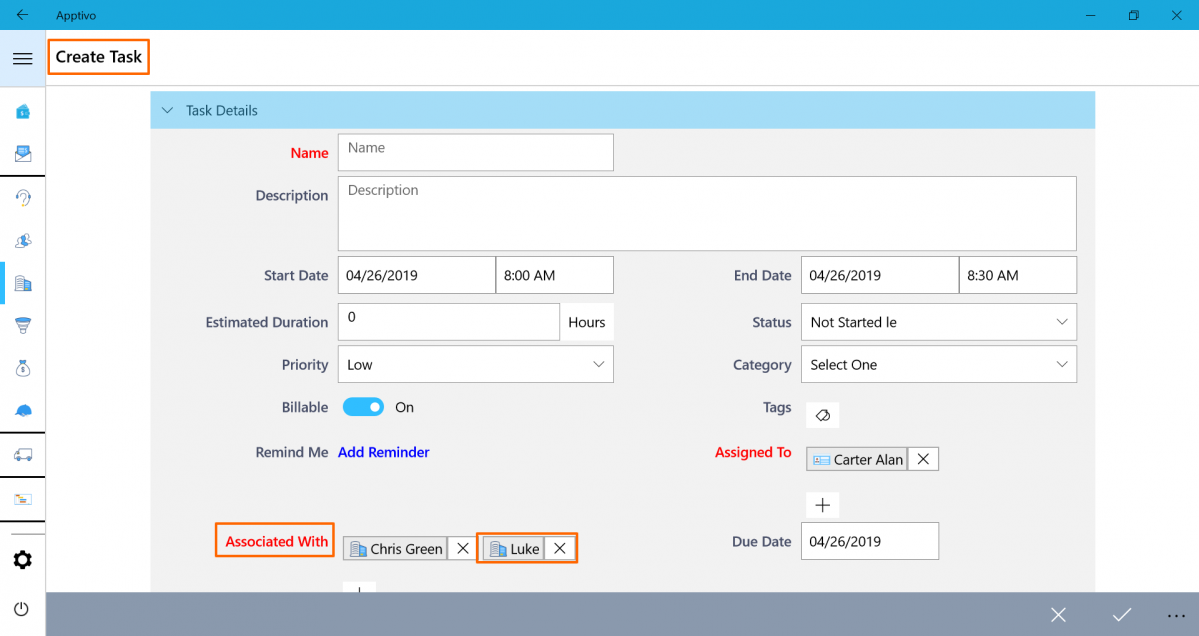
|
Now you can also find the task getting reflected in the Parent Customer Task.
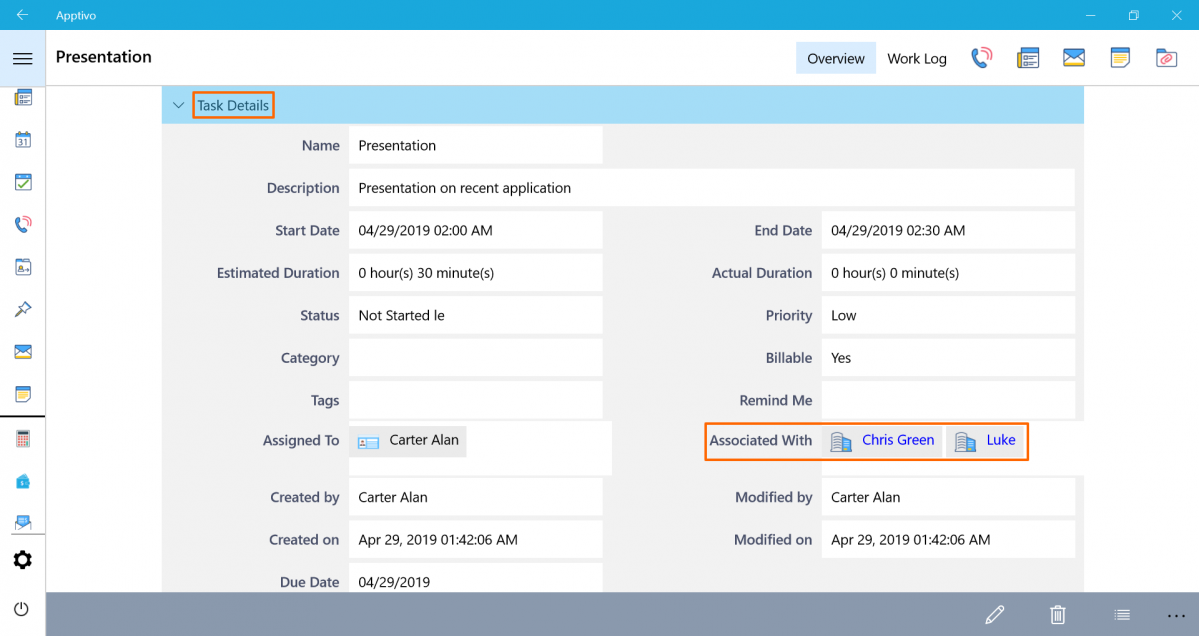
|
Create and set privileges for tags
Adding to the unique implementation list is the creation of Tags by Employees/contacts. Now, you can also provide your Employees with the privilege of creating tags without giving access to the Settings. You can provide the privilege of creating tags in Contacts, Cases, Customers, Leads, and Opportunities Apps. Tags are created as Labels to group the records using relevant tags. You can fetch the contacts based on the tags quickly.
For Instance: Let’s consider the Contacts App. You can give the privilege of creating Tags to your employees instead of granting them access to the Settings.
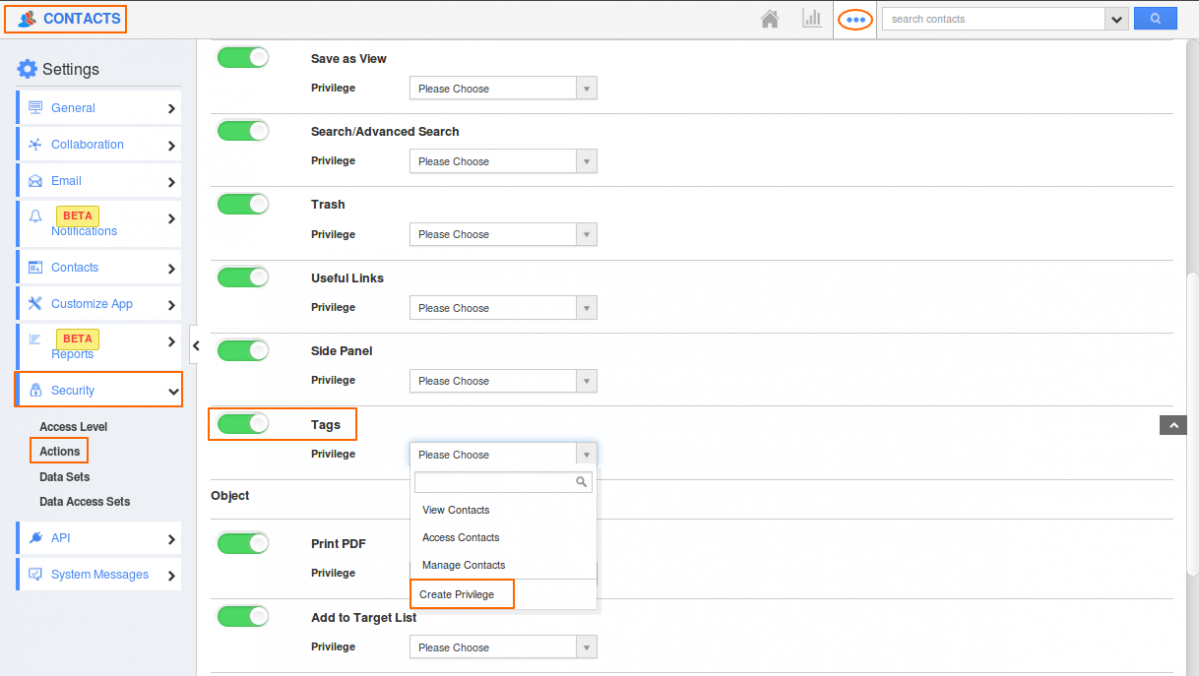
Log in and access Contacts App from your universal navigation menu bar. Click on the More(…) icon -> Settings -> Security -> Actions. Enable the Tags toggle and Click on the “Privilege” dropdown and select “Create Privilege”.
|
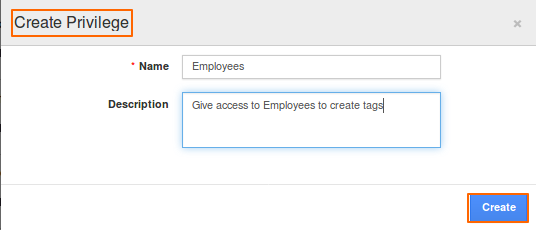
You will get a pop-up to create privilege. Fill in the Name and description of the Privilege and click “Create”.
|
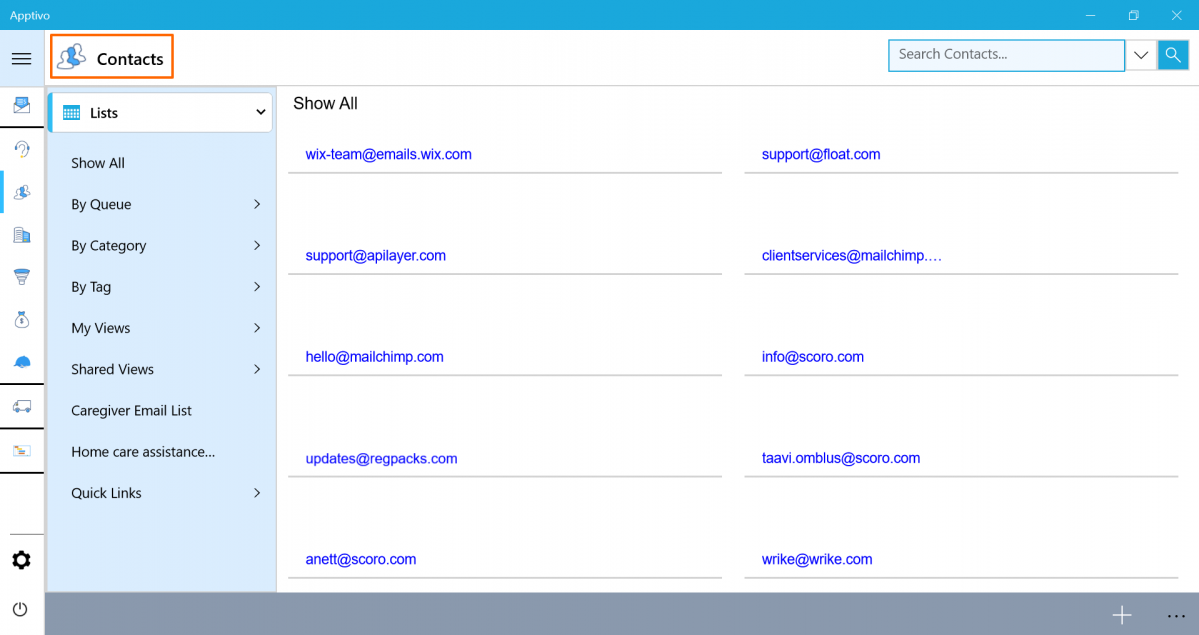
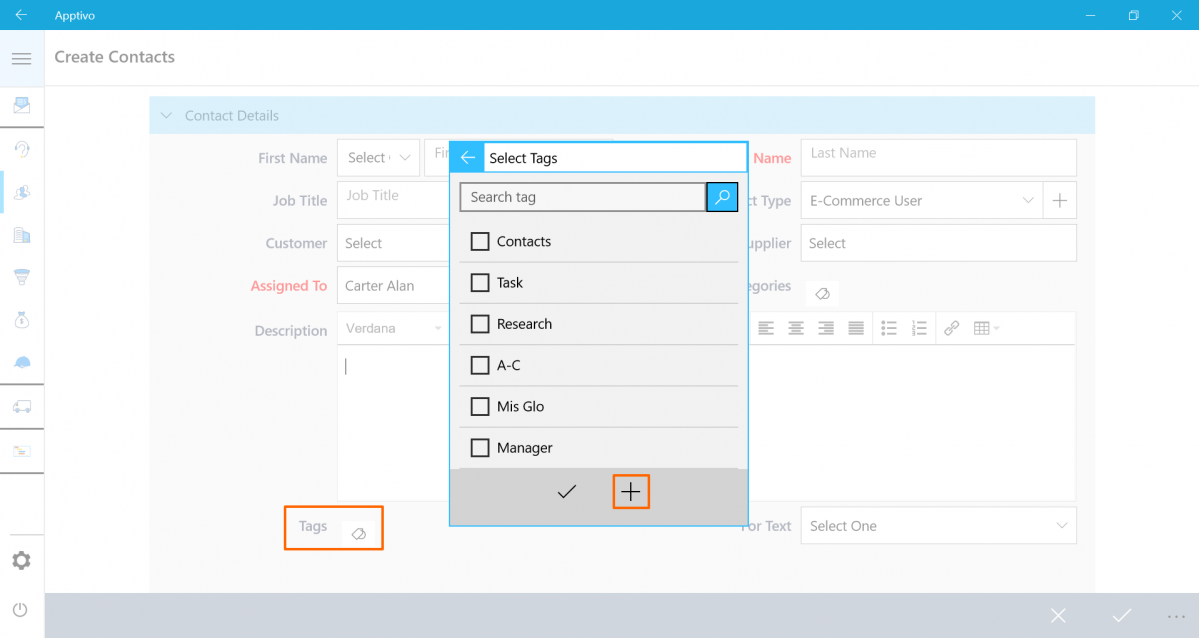
When an employee logs in and clicks on Tags while creating a Contact.
|
You can find the tags that were already created along with an option to create a new tag.
|
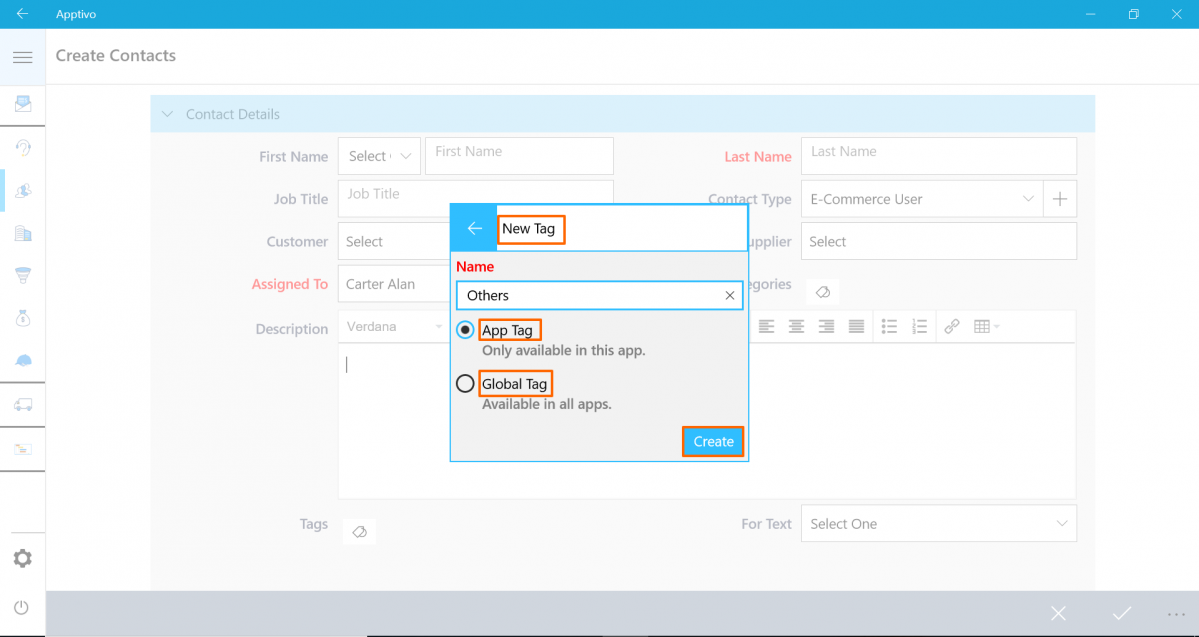
Click on the “Create New”, you will get a pop-up to create a tag and to choose if it is an App tag or a Global tag. The employee can find the tag created and tagged once he clicks on “Create”.
|
Supported Numbers ToWords conversion
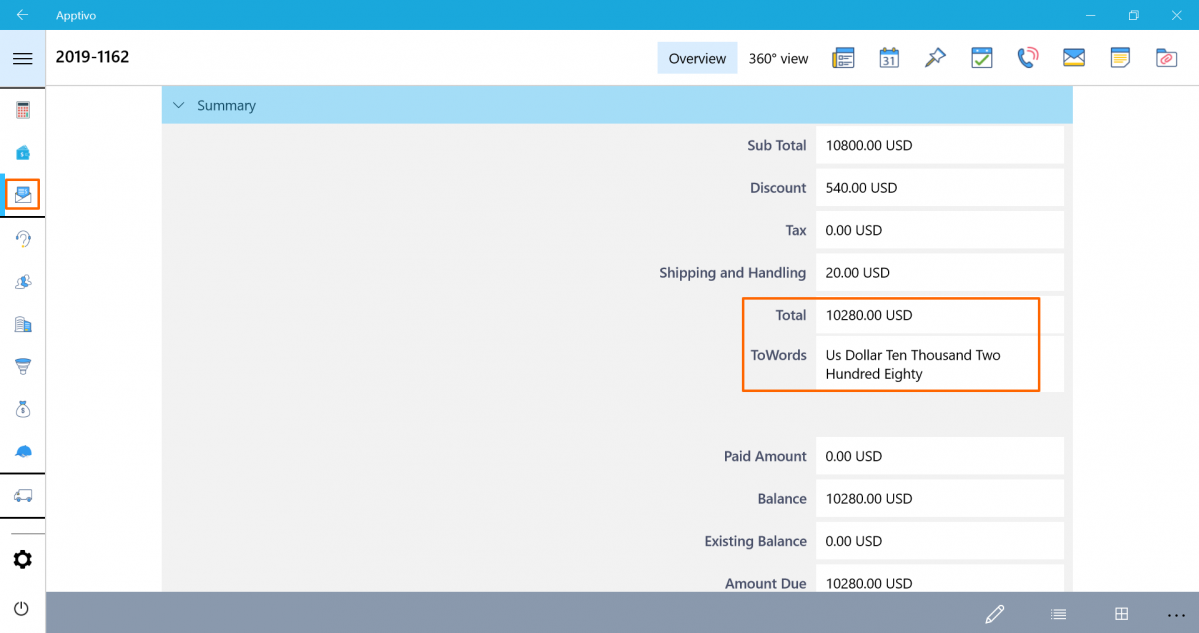
A new implementation common to all the apps in Apptivo is the Amount To Words attribute. In the Invoices, it will be a statutory requirement for banking and shipping related processes to have the Amount field generated in words. This feature enables you to display the numbers (amount) in words. That is, if the Amount field is 10280 USD, then it will show as US dollar Ten Thousand Two Hundred Eighty. Here are the steps to configure the ToWords conversion.
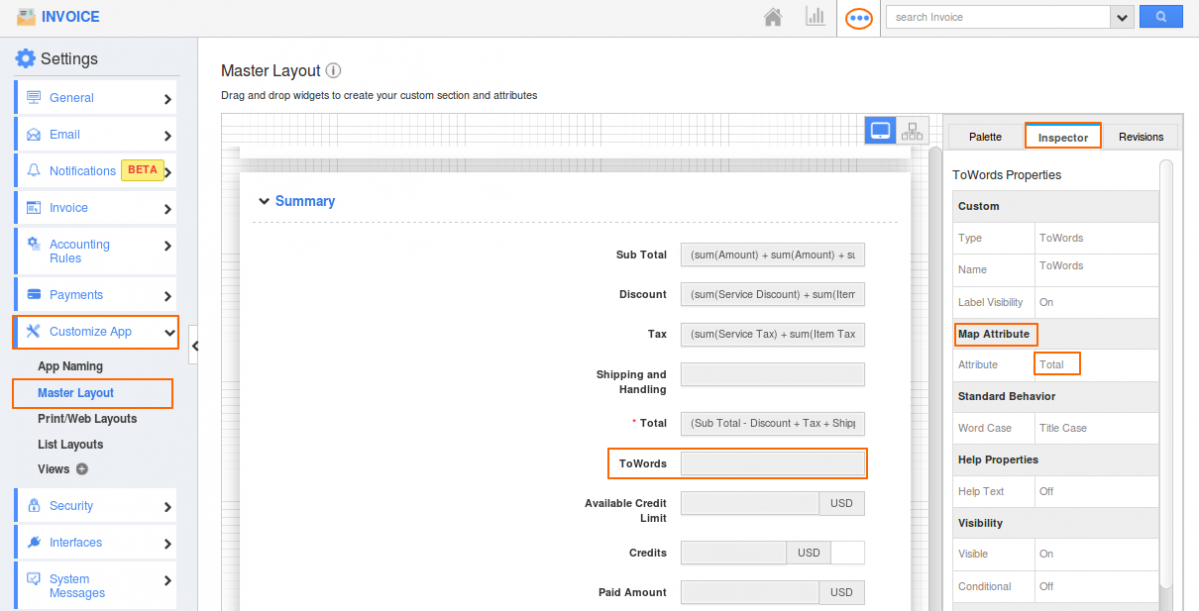
Click Settings -> Customize App -> Master Layout -> drag and drop the ToWords attribute. In the Inspector tab, select the required attribute under Map Attribute section (The Map Attribute drop-down lists all the Number, Currency, and Numeric Formula fields configured in the Invoices App). Here, we have mapped it to the “Total” field. You can also define the Word case (upper case, lower case, title case, and sentence case). Then, click Save.
|
The amount in the Total field will get displayed in ToWords in the Overview page, as shown in the below image.
|
Stay Tuned with all updates in Apptivo by clicking here!!!
Have a great day!!
Cheers,
Jeyapriya
Latest Blogs

Apptivo's Integration with Amazon SES for Outgoing Email Server
Amazon Simple Email Service (SES) is an email platform that provides an easy, cost-effective way to send and receive email using your email addresses and domains. Apptivo has migrated its email service to Amazon SES (Simple Email Service) to enhance the performance and reliability of our email services
Read more →
EXPLORING MULTI CHANNEL CUSTOMER SUPPORT SOFTWARE
1.What is customer service software? 2
Read more →
Maximize your business performance with seamless CRM Integration
1.What is CRM Integration? 2
Read more →
